How We Use the Lot-O-Tumbler
Watch this video to learn how to properly load the Lot-O-Tumbler barrel to get optimal tumbling action.
There are many different "recipes" for processing rock in the Lot-O-Tumbler. This article shares the method that we use for the single-barrel Lot-O-Tumbler. This method has worked well for us, and we encourage you to try any of the ideas here to see how they work for you.
Our procedure uses more grit than the instructions provided by others. Our first goal is to produce the best possible polish. Our second goal is to spend our time wisely. We settled on this method after much experimentation. The amount of grit used is still far less than half of what you would use to process the same amount of rock in a rotary tumbler.
We have no association with the manufacturers of the Lot-O-Tumbler, other than being a retailer of their products and enthusiastic users of the Lot-O-Tumbler. We suggest that you thoroughly read and follow the instructions that come with the Lot-O-Tumbler because they contain important information. The ideas presented here are simply our approach to using a quality piece of lapidary equipment.
Rotary vs Vibratory Tumblers: What's the difference?
Vibratory Tumblers vs. Rotary Tumblers
The Lot-O-Tumbler is a vibratory tumbler. However, most hobbyist tumblers sold today are rotary tumblers. Vibratory tumblers and rotary tumblers both smooth and polish rough rock material; however, there are three significant differences in how they operate. These differences are:
1) Vibratory tumblers are a lot faster. For example, the medium grit, fine grit, and polishing steps in a vibratory tumbler require just one to two days each. These same steps in a rotary tumbler require seven days each. This is a significant time savings - and an electricity savings!
2) Vibratory tumblers require less than half as much grit and polish to process a batch of rock. This is a significant money savings.
3) Vibratory tumblers do not significantly change the shape of the rough rock - they simply smooth the surface. In contrast, rotary tumblers rapidly wear points and edges from the rough to produce tumbled stones with a much more "rounded" shape (see photo below).
We like "round" tumbled stones, we like to process our rock quickly, and we like to save money on grit and polish. So, our method is to use a rotary tumbler for the coarse grind step of the tumbling process to round the rocks. Then we use the Lot-O-Tumbler vibratory machine for the medium grit, fine grit and polishing steps. This allows us to take advantage of the strengths of both vibratory and rotary tumbling to produce rounded tumbled gemstones with approximately a 50% savings in time and a 50% savings on grit and polish, plus a 50% savings on electricity.
For agate, jasper, and all other varieties of chalcedony, we believe that the Lot-O-Tumbler produces a higher quality polish than a rotary tumbler. It also produces a better polish on many other materials.
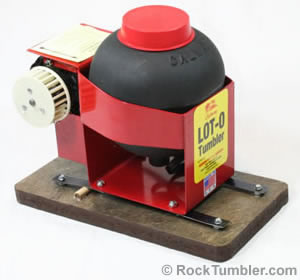
Photograph of the single barrel Lot-O-Tumbler right out of the box. To be ready for use, it must be attached to a heavy anchor such as a concrete block. It will process about four pounds of rock in just a few days.
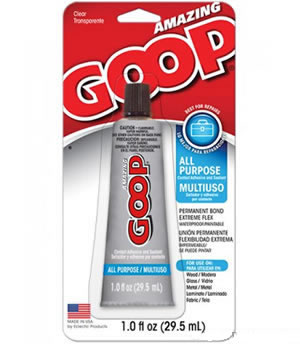
The Amazing Goop: Goop is an all-purpose permanent adhesive. We used it to glue our Lot-O-Tumbler to a concrete block in 2009 and it is still holding strong - after thousands of hours of tumbling!
Preparing the Lot-O-Tumbler for Use:
The Lot-O-Tumbler is a vibratory tumbler that must be mounted to a heavy object to operate properly. Attaching the tumbler to a heavy object anchors the machine firmly and allows the energy generated by the motor to vibrate the rock in the barrel.
PLEASE NOTE: Some people are tempted to bolt or glue the Lot-O-Tumbler to their workbench. We do not recommend this! The tumbler will vibrate the entire bench, and your tools will start jumping around on the bench and fall to the floor. Your bench might walk around your workshop! Also, attaching the tumbler to the bench will amplify the noise produced by the tumbler.
Here's what we did. We obtained a standard concrete block (8" x 8" x 16" in size and about forty pounds in weight) and filled the holes in the block with concrete, bringing its weight up to about sixty pounds. We then painted the block to give it a smooth surface that adhesive would stick to. We used some leftover interior wall paint and gave the block two coats.
When the paint was completely dry, we glued the base of the Lot-O-Tumbler to the top of the concrete block with Amazing Goop All-Purpose adhesive (which can be purchased in hardware and craft stores across America). If you have never heard of Amazing Goop, a photo accompanies this article.
We then placed the concrete block on top of a piece of 1" thick foam insulation board. Placing the block on the foam decreased the vibrations against the floor and significantly reduced the noise.
You can see our tumbler in action by watching the video at the top of this page.
Running the Lot-O-Tumbler as described above produces about 61 to 64 decibels of noise at a distance of about three feet. This is about the same amount of noise produced by the tiny Thumler's MP-1 tumbler with a 2-pound barrel, or about the same amount of noise produced during normal conversation. If you want to know more about tumbler noise, please see our article here.
| You might be skeptical about gluing your Lot-O-Tumbler to a concrete block with Goop. I was skeptical about it too. But, as I update this article today, I can tell you that my Lot-O-Tumbler is still firmly attached to that block - over ten years and a lot of tumbled stones later. |
Step 1 - Coarse Grind:
As mentioned above, we use a rotary tumbler for the coarse grinding step because we like tumbled stones with a rounded shape. We process rough rocks in a rotary tumbler with coarse grit (60/90 or 80 mesh) until they have the desired shape. We then clean the rough thoroughly and use the Lot-O-Tumbler for the remaining steps.
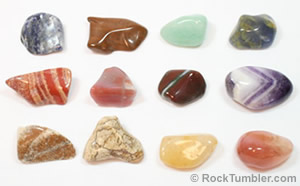
Vibratory tumbled stones and rotary tumbled stones. What is the difference? The six tumbles on the left were processed with the Lot-O-Tumbler from start to finish. The six tumbles on the right were processed with a rotary tumbler from start to finish. Vibratory tumblers smooth the rocks and do little to change their shape. This yields the angular tumbled stones on the left. The action of a rotary tumbler rounds sharp points and edges. This yields the rounded tumbled stones on the right.
Step 2 - Medium Grind:
We begin by loading a mixture of clean rough and ceramic cylinders into the Lot-O-Tumbler barrel, filling it to within about 1" of the top opening. We use about 20% ceramic media with most types of rough. However, if we are tumbling materials that bruise easily, such as obsidian, glass, or crystalline quartz (rock crystal, smoky, citrine, rose, aventurine, tiger's-eye, etc.) we mix in at least 30 to 40 percent ceramic media to protect the rough from bruises.
We fill the barrel with water to wet the rough and the inside of the barrel. We then cover the opening of the barrel with one hand and turn it upside down, allowing the water to drain out between our fingers. (The goal is to have the rocks wet - so that the grit sticks to them - but not have excess water that will wash the grit from the rocks.) One or two level tablespoons of a medium grit such as 150/220 or 120/220 silicon carbide is added to the barrel, the lid is replaced, the barrel is placed on the Lot-O-Tumbler machine, and it is turned on.
As the tumbler runs, the grit sticks to the surface of the wet rocks, turning every rock surface into an instant piece of sandpaper. If the vibrating rocks settle a little below one inch from the top, we add a couple more pieces of rough or a few more pieces of ceramic media to get it up to operating level. You want the load of rock churning in the barrel without hanging up on the opening at the top of their circulation.
The tumbling action of the rocks in the barrel removes material from the rocks, and a thin layer of "mud" begins to build up on the rock surfaces. After about 12 hours, we stop the tumbler and rinse the rock by filling the barrel and draining the muddy water out a few times. We then add one level tablespoon of 150/220 or 120/220 grit, replace the lid, and turn the machine back on for another 12 hours. If the volume has dropped, we add a few broken-in ceramic pellets to bring the contents of the barrel up to operating level.
PLEASE NOTE: When you rinse the rock, don't allow the muddy water to go down the drain - it can clog your plumbing!
We continue rinsing every 12 hours and adding fresh grit until we feel that the rocks are ready for the fine grit step. Normally only 24 to 48 hours is needed if you have shaped your rocks in a rotary tumbler.
When we are finishing our final run of medium grit, it is time to give the rocks a good cleaning in preparation for the fine grit step. Instead of stopping the tumbler, we remove the lid and add a few drops of liquid dishwashing detergent such as Palmolive or Dawn to the barrel along with about three tablespoons of water (we recently tried Dawn Direct Foam and it is our new favorite). The soap and water form a froth that washes the grit and mud from the rocks. We allow the tumbler to run for another ten to fifteen minutes - until the rocks start to look free from grit and mud. We then stop the tumbler, remove the barrel and thoroughly clean the rocks, ceramic cylinders and the barrel - being sure to wash every speck of grit and mud from the rocks, cylinders and the barrel.
Grit and mud can be hard to remove from the rim of the barrel. We scrub it with a toothbrush and rinse thoroughly.
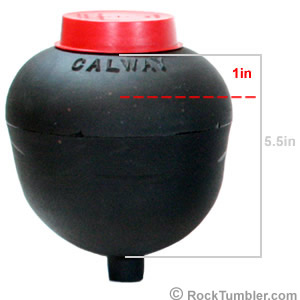
When we use the Lot-O-Tumbler we fill the barrel to within about one inch of the top.
Step 3 - Fine Grit:
After the rocks, cylinders and barrel are thoroughly clean, we return the rocks and cylinders to the barrel, fill it with water, turn it upside down and allow the water to drain. We then add one level tablespoon of 500 or 600 grit, replace the lid and tumble for 12 hours. At the end of 12 hours we stop the tumbler, rinse the rock, add one tablespoon of 600 grit, replace the lid and turn the machine on for another 12 hours.
After 24 hours of tumbling with 500 or 600 grit, the rocks are ready for the polishing step. We repeat the ten to fifteen minute wash with dishwashing liquid and a few tablespoons of water and then clean every speck of mud and grit from the rocks, cylinders and the barrel.
Step 4 - Polishing:
| We have a special Lot-O-Tumbler barrel that we use only for the polishing step. We dedicate a special barrel to polishing to avoid grit contamination that can ruin a great polish. We don't use this special barrel for every batch that we polish - but we still get a great polish by cleaning our regular barrel extra well after the fine grit step. However, any time that we have some really nice material or are going for the best possible polish, we use our polishing barrel. |
The thoroughly washed rocks and cylinders are placed in the polishing barrel, and it is filled with water and turned upside down to drain. We then add two level tablespoons of TXP aluminum oxide polish to the barrel, replace the lid and start the tumbler.
We allow the mix to tumble for 15 to 30 minutes, then we remove the lid while the tumbler is still running and examine the consistency of the polish slurry that coats the rocks. Our goal is to have the rocks coated with a slurry that is about the same consistency as latex house paint. If it is too thick, we add water, a few drops at a time, to adjust the thickness of the slurry. If it is a little too thin, that is OK because it will thicken as it tumbles. If it is way too thin, we add a tiny amount of polish.
After 12 hours of tumbling, we remove the lid and check how things are going. If a milky liquid of water and polish is coating the rocks, we replace the lid and allow the rocks to tumble for another 12 hours. If the slurry is becoming a sticky paste, we add a few drops of water - enough to remobilize the polish into a milky liquid.
We don't add more polish because the aluminum oxide has a hardness of about nine and should not be wearing out. And, because very little material is being removed during this step, the aluminium oxide is not being diluted with rock mud.
The amount of time needed for the polishing step depends upon the material being tumbled and its condition after the fine grit step. Some agates and jaspers will acquire a nice polish in just 12 hours. But, a little more time usually improves the luster. We usually allow all of our rocks to tumble at least 24 hours before we do the final check described below.
NOTE: Almost every quality tumbling rough that we have placed in a Lot-O-Tumbler polishes well with TXP and sometimes a little better with #61 Rapid Polish. We use TXP over 90% of the time. For a lot more information about TXP and #61 Rapid Polish, read the information at the links.
Keep in mind that most rocks will not take a polish no matter what you do.
At the end of 24 hours in the polish, we remove a few rocks from the barrel, wash them, dry them and inspect their polish. If the load in the tumbler includes several types of rock, a couple pieces of each rock type should be examined. If some of the rocks are not brightly polished, we return them to the barrel and run for 12 more hours, then remove again for another inspection.
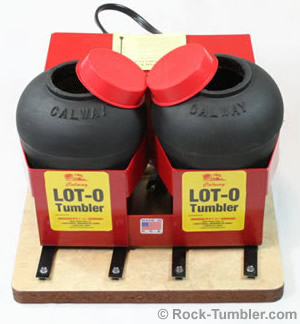
A two-barrel version of the Lot-O-Tumbler. This machine will allow you to process four pounds of rock in each of the barrels.
Step 5 - Burnishing:
The luster of some rocks can be improved using a procedure known as "burnishing" (we suggest that you read our full article about burnishing here). This final step is a short tumble in soapy water. We place the cleaned rocks back into the barrel, add about three tablespoons of water and about one teaspoon of dishwashing detergent (We use Dawn Dishwashing Liquid for burnishing in the Lot-O-Tumbler). We then tumble this mixture for an hour or two in the soapy water. This last step removes polish trapped in tiny pore spaces and cleans any film from the surface of the rock.
When this step is complete, you can rinse the rocks, dry them and admire the results of your work!
A Few Words About "Gas"
A few materials will produce gas when tumbled. This generally isn't a problem in a rubber-barrel rotary tumbler. However, the red friction-fit cap on the Lot-O-Tumbler can be popped off if a small amount of gas pressure builds up in the barrel. We have had it pop off a few times when tumbling volcanic glasses like obsidian and when tumbling man-made glass.
The problem with the lid popping off is that the small amount of moisture in the barrel will evaporate, and your rocks will become welded together in the dry rock mud. The solution is simple! Poke a tiny hole in the red cap to allow the gas pressure to seep out.
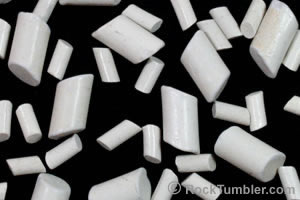
If we don't have enough rocks to fill the tumbler barrel to operating level we use ceramic media to make up the volume. We also use ceramic media when we are tumbling a load of large rocks, without small rocks to fill the voids between them. The small ceramic cylinders act like roller bearings between the large rocks to facilitate a tumbling action in the barrel. The small cylinders in the void spaces between the large rocks also provide many more points of contact while the load is tumbling and this makes more points of friction (and grinding) within the barrel.
Size of Materials Tumbled
We have had great success using the Lot-O-Tumbler, and most of the materials that we tumble today spend the medium, fine and polish steps in the Lot-O. It will tumble any rock that you can fit through the opening (which is slightly over two inches in diameter). However, with large materials like that, you must have them absolutely swimming in small ceramic pellets or other small rough. These are needed to deliver grit to the surface of the rock. If you place six or seven large rocks in the barrel, there will be only six or seven points of contact between them where abrasion can occur!
We have also found that filling the barrel with all small material (about 1/4" or less) will not produce a good tumbling action. The small material tends to "stick together" and not achieve good motion in the barrel. Use a mix of particle sizes for best results.
Conclusions:
We use the Lot-O-Tumbler because it processes rock rapidly, uses very little grit, and produces a brilliant polish on the types of rock that we tumble. Because we like "rounded" tumbled stones, we use a rotary tumbler for one or more coarse grinding steps, then do the fine grind, prepolish and polishing steps in the Lot-O-Tumbler.
If you normally run your rough through the coarse grind twice with a rotary tumbler, a large rotary tumbler like the Thumler's Model B will produce enough pre-tumbled material to keep a single Lot-O-Tumbler running continuously, or a Lot-O-Tumbler Twin running once a week.
Happy Tumbling!
RockTumbler.com Authors
 |
Hobart M. King has decades of rock tumbling experience and writes most of the articles on RockTumbler.com. He has a PhD in geology and is a GIA graduate gemologist. He also writes the articles about rocks, minerals and gems on Geology.com. |

