
Tumbling Instructions for Agate, Jasper, Petrified Wood
and Other Rocks with Similar Properties

|
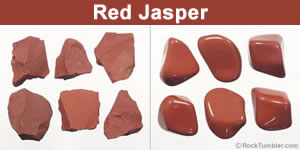
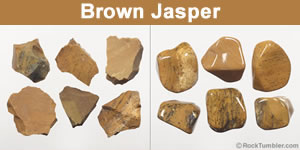
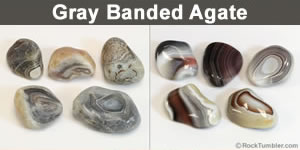
Tested Tumbling Rough: Here are a few jasper and agate tumbling roughs that we have tumbled many times ourselves in small rotary tumblers, using the recipe described on this page. We believe that if you follow the recipe on this page, using quality grit, TXP polish and ceramic media, you will get great results. Click on one to learn more. Tumbled stones and photographs by members of the RockTumbler.com staff.
The Most Popular Tumbling Rocks
Agate, jasper and petrified wood have been the most popular tumbling roughs since the rock tumbling hobby began in the 1950s. Here are the reasons why...
 they are easy for beginners to polish
they can be polished to a high luster
their wide range of attractive colors
their beautiful and interesting patterns
they are inexpensive
their durability and resistance to bruising
they are abundant and widely available
many people can collect them for free
they are easy for beginners to polish
they can be polished to a high luster
their wide range of attractive colors
their beautiful and interesting patterns
they are inexpensive
their durability and resistance to bruising
they are abundant and widely available
many people can collect them for free
Start With Something EasyWe want you to be successful. So, our advice for people new to rock tumbling is: "Agate, jasper, and petrified wood are easy to polish in a rock tumbler. Tumble these easy materials one or two times to prove that your methods, equipment and supplies are working properly. Once you are successful, you can then move on to more challenging materials. |
Other Types of Chalcedony
The tumbling instructions on this page work well for agate, jasper and (silicified) petrified wood. These three materials are all varieties of microcrystalline quartz known as "chalcedony".
The instructions also work well for many other types of chalcedony - provided that they are correctly identified and of tumbling grade. These include: bloodstone, carnelian, chert, chrysoprase, flint, mookaite, and sard. All of these can be tumbled using the procedure explained on this page. Some other rocks with a Mohs Hardness between 6 and 8 can be tumbled successfully with these instructions.
Start With Something Easy
Why do we recommmend this? We recommend it because many people buy a rock tumbler because they want to polish opal, turquoise, ruby, marble, fluorite or other materials that require special knowledge, skills, materials, methods or equipment. Beginners who try to tumble these materials almost always fail. We suggest starting with easy materials and get some success. Then advance up to more difficult-to-polish materials when you are ready to learn new methods.

Here are some tumbled stones polished by Adam Rittenhouse of our staff using the tumbling recipe explained on this page. He tumbled them using the grit and polish sold on this website in a Thumler's Model A-R2 rock tumbler. If you start with quality rough, use quality grit/polish, and follow these instructions faithfully, we think that you can make tumbled stones as nice as these. Stones tumbled by Adam Rittenhouse, photographed by Angela King.
Let's Get Started!
Here is the five-step recipe that we use for tumbling pieces of jasper, agate, and petrified wood about 1/2 inch to 2 1/2 inches in size in a rotary tumbler. We explain each step in detail below.
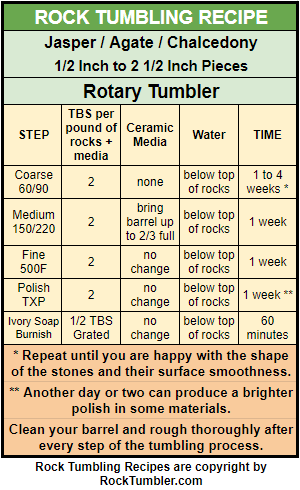
Rock Tumbling Recipe for Jasper, Agate and Petrified Wood: Here is the recipe that we use for polishing these materials in a small rotary tumbler. It is a five-step recipe, but we often repeat the first step one or more times for higher quality results.
Rotary Tumblers
Step 1: Coarse Grit (60/90 mesh)
Load the Barrel: We begin by adding pieces of rock to the tumbler barrel until it is about 2/3 full. We gently drop the rocks into the barrel. We don't try to "pack them in" or carefully arrange them. We don't shake the barrel to arrange the pieces more efficiently. We want the barrel about 2/3 full of loose rock.
Important: Don't fill the barrel more than 2/3 full, or your rocks will not have enough space to tumble properly. (If you run the barrel week after week and your stones are not being rounded and smoothed, you might have too many rocks in the barrel or they have been tightly packed in the barrel.)
Add Grit: We add two level tablespoons of coarse (60/90 mesh) silicon carbide grit for each pound of rock in the barrel.
Add Water: We then slowly pour water into the barrel until the level of water in the barrel almost reaches the tops of the rocks.
Close and Tumble: Now we place the lid on the barrel, place the barrel on the tumbler, turn on the tumbler, and allow it to run continuously for one week.
Open the Barrel: This is a good time to put on a pair of safety glasses or goggles - to protect your eyes in case some of the water in the tumbler barrel splashes. We open the barrel carefully in a location where a spill can easily be cleaned up. The water in the barrel will be muddy!
Rinse the Rocks Promptly: We have a plastic colander (spaghetti strainer) over a large plastic bucket ready in advance. We then gently dump the contents of the barrel into the colander - the muddy water falls through the colander and into the bucket.
Then we run some water into the empty tumbler barrel, swish it around gently to rinse the barrel, and gently pour that water over the muddy rocks to rinse them. After dumping a couple barrels of water over the rocks, we move the rocks around in the colander - to expose other sides of the rocks that need more rinsing. We then slowly pour more water over them in an effort to rinse all of the mud off of the rocks.
We then transfer the rinsed rocks into a plastic wash basin for additional inspection and cleaning. We also thoroughly clean the barrel and the lid - we often use a toothbrush to help with this cleaning.

Used grit and rock mud should never be washed down a drain. It can clog your plumbing system. We wash rocks in a plastic colander over a plastic bucket to keep the mud out of the drain.
Ready for Step 2? Once you are satisfied with the shape of your rocks, it is time to move on to Step 2. Make sure that your rocks, barrel, and lid are as clean as possible - especially the rim of the barrel and its inside corners. We don't want to transfer particles of coarse grit into the medium grit step.
How Many Weeks In Coarse Grit?The goal of the coarse grit step is to convert broken pieces of rock into smooth, slightly rounded pebbles. After one week, our rocks usually still have some rough spots and some edges that need smoothing. So, we repeat the coarse grit step. This second week in coarse grit helps us to produce higher quality tumbled stones that are more pleasing in shape and have fewer rough spots and imperfections. Two weeks is usually enough for rocks up to about 1 1/2 inches in size, but rocks that are larger, harder, or of imperfect shape can require three or more weeks of tumbling in coarse grit. |
Step 2: Medium (150/220) Grit
Our Goal: The goal of the medium grit step is to simply smooth the surface of the rocks that you have shaped nicely during the coarse grit step. This step usually takes only one week if you have nicely rounded the rocks in coarse grit.
Inspect: Before you load the barrel, make sure that your rocks are ready for the smoothing (medium grit) step. Remove any rocks that have broken edges that might scratch other stones or open cavities that might hold coarse grit particles.
Load the Barrel: Place your cleaned rocks into your cleaned barrel. If the level of rocks in your barrel has dropped down below 2/3 full, we suggest adding just enough ceramic media (large is less expensive and will work fine) to bring the barrel level up to between approximately 2/3 full. Add two tablespoons of medium (150/220 mesh) grit for each pound of rocks plus media, and add enough water to almost cover them. The media will act as a filler and will help the rocks tumble more smoothly in the barrel. Run your barrel on the tumbler for one week.
Rinse and Clean: Rinse and clean your rocks in a plastic colander over a plastic bucket as described above. Your rocks should be very nicely shaped, and their surfaces should feel very smooth.
Step 3: Fine Grit (500F)
(The "500F" means "500 grit or Finer".)
Our Goal: The goal of the fine grit step is to make your rocks super smooth and ready for the polishing step. A bright polish can only be accomplished when the surface of the rock is as smooth as glass. If you have nicely smoothed the rocks during the medium grit step, the fine grit step should only take one week.
Load the Barrel: Place your super-clean rocks into your super-clean barrel. We scrub the rim and inside of our barrel with a toothbrush. If you added media in the last step, keep it with the rocks. Add two tablespoons of fine (500F) grit for each pound of rocks, and add enough water to almost cover them. Do not add any additional rocks, and do not add any additional ceramic media. Run your barrel on the tumbler for one week.
Rinse and Clean: Rinse and clean your rocks in a plastic colander over a plastic bucket as described above. If you lightly brush a fingertip over the surface of one of your rocks, it should feel super smooth. A dry rock at this stage of the process might have a slight luster.
Inspect: It is important to inspect your rocks again at this point. Any that are broken, have sharp edges, or contain open cavities that could hold fine grit should be removed before the polishing step.
Step 4: TXP Polish
Congratulations! All of your hard work, care in following instructions, and the quality of your rough rock are now going to be tested in the polishing step. The goal of the polishing step is to produce a bright, lustrous surface.
Make sure that your rocks and your barrel are super clean. Any grit or debris in the barrel at this time will scratch up your polish. If any of your rocks have been broken or chipped from tumbling, remove them now. The sharp edges on those rocks can scratch every rock in the barrel during your polishing step.
Load the Barrel: Place your super-clean rocks and your super-clean media into your super-clean barrel. We scrub the lid, rim, and inside of our barrel with a toothbrush. Add two tablespoons of TXP aluminum oxide polish for each pound of rocks, and add enough water to almost cover them.
Do not add any additional rocks, do not add any additional ceramic media. Please do not add any additional stuff recommended on social media, in somebody's book, or that you read about on some other website. Nothing additional is needed. Run your barrel on the tumbler for one week.
Rinse and Clean: Rinse and clean your rocks in a plastic colander over a plastic bucket as described above. If you dry one of your rocks, hold it between your thumb and index finger at about chest height and look down on it, you should see a nice luster to a super-bright finish. Congratulations!
Some agates, jaspers, petrified woods and varieties of chalcedony polish brighter than others. A few are "below tumbling grade" and do not polish at all.
Step 5: Burnishing (Optional)
Burnish If Needed: The burnishing step will sometimes kick your tumbled stone polishing up a notch. We used to live in a community where the city water supply was well-known for delivering hard water. I tumbled several different types of rock using quality grit and polish, but I didn't get a shine on any of them like I could produce at my previous residence. I knew about "burnishing" but had never needed to do it. So, I tried it - and it really improved my tumbled stones. Please see our detailed article about burnishing tumbled stones.
RockTumbler.com Authors
 |
This page was prepared by Adam Rittenhouse, Angela King and Hobart King of RockTumbler.com. Together they have decades of rock tumbling experience. They have also authored the articles about rocks, minerals and gems on Geology.com. |