
Gray Banded Agate Nodules
Accepts a brilliant polish - often more colorful than the name suggests.
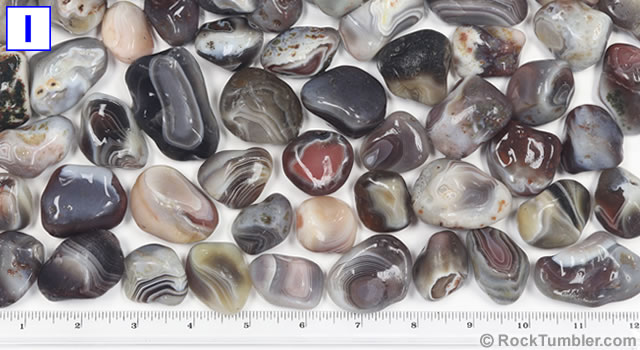
Gray Banded Agate Nodules range in size from about 1/2 inch to about 1 1/2 inch in diameter - measured across their maximum dimension. The agates above are a random grab from the barrel in which they were shipped to us. The agates in the photo have been washed and were photographed wet to show their potential polished color (which should become more vivid after you grind away the rind and bruises). Note from the photo that these are whole and partial nodules.
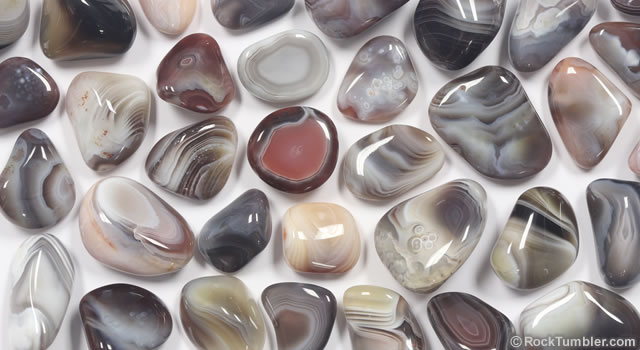
Here are some of the gray banded agates that we polished. Many of the agates in this photo are shown in the photo of rough agates at the top of this page. If you compare, you will see that tumbling them for a few weeks in coarse grit (and subsequent steps) exposed more banding and color in most of the stones. They also accepted a super-bright polish.
Gray Banded Agate Nodules
(Tumbling or Cabbing Rough)
 ,
,  , and
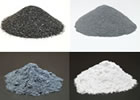
, and  What do they mean?
Size: Mostly 1/2 to 1 1/2 inch pieces (measured along their maximum dimension).
About 10 to 15 nodules or partial nodules per pound.
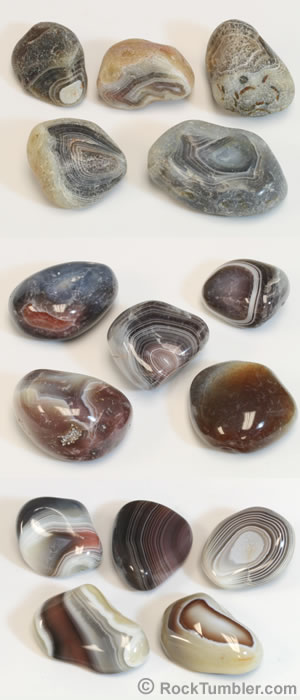
TOP FIVE STONES: These are rough nodules as we receive them. They have a dull appearance, and with a magnifying glass you can see a lot of tiny curved fractures descending into their interior. These are bruises that the nodules suffered in their natural stream/beach environment. These agates are really hard and really tough - so it will take some serious grinding to remove the fractures.
MIDDLE FIVE STONES: This is what they look like after we tumbled them for one week in a rotary tumbler using coarse grit and then proceeded through the medium grit, fine grit and polishing steps. Phooey! The grinding wasn't deep enough. The nodules still have a lot of tiny fractures from the bruises descending into their interiors. We should have inspected them better before moving them to the vibratory tumbler. Back to coarse grit! Three tumbling steps, grit, polish, time and electricity wasted!
BOTTOM FIVE STONES: Wow! That's what we were looking for. Perfect Stones. All of the bruises are completely removed, and the polished agates are spectacular. They have beautiful bands and bull's-eye structures - and they accept a super-bright polish if you spend the time needed to grind away the outer fracture surface. What did it take to get here? We tumbled them for three more weeks in coarse grit - then did medium, fine, and polish over again.
A lot of people think... these nodules are already rounded for me. I should be able to run them thorugh fine grit and polish and have beautiful polished stones. Hey! Don't underestimate the amount of grinding time needed to remove surface bruises from agate.
Read more about tumbling stream- and beach- rounded roughs here.
About This Rough
What Are Agate Nodules?
Agate nodules are found in many parts of the world, especially in areas where thick sequences of stacked basalt flows are found. After the basalt solidifies and cools, cavities that were once air bubbles trapped within the molten lava serve as precipitation sites for agate. The nodules inherit their ovoid shape from these cavities. As silica precipitates on the walls of the cavities, the agate forms in layers of varying thickness, different translucency, and different colors.
The agate is much more resistant to weathering than the basalt, so as the basalt weathers away, the agates remain behind in a residual soil. Over thousands of years, the residual soil and its contained agate is transported into stream valleys by soil creep.
Then the nodules are picked up by streams and transported long distances to the sites where humans find them. During this transport, the nodules are usually bruised as they bounce off of the stream bottom, bounce off of rocks, and impact one another. Each bruise is a small fracture that propagates into the nodule. These bruises often propagate to a depth of 1/8 inch or more.
How We Tumble This Rough
We are lucky to have both rotary and vibratory tumblers.
Below we will provide instructions so that you can tumble these nodules in either rotary or vibratory tumblers. But, just saying what we do... we tumble the coarse grit step in a rotary tumbler and then do the medium, fine and polishing step in a vibratory tumbler. Our reasoning for this is explained below.
We believe that rotary tumblers are the proper tool for doing the initial shaping of durable stones and the proper tool to use when your rough is durable and needs a significant amount of material removed. This perfectly describes these Gray Banded Agate nodules. So we use rotary tumblers for the initial shaping step.
We believe that vibratory tumblers do a fast and effective job for the medium grit and fine grit smoothing steps. So we switch to vibratory tumbling for these steps when tumbling Gray Banded Agate.
We have found that vibratory tumblers quickly produce a brilliant polish on Gray Banded Agate. Vibratory tumblers also allow us to open the barrel and check the progress of the polish. That is why we use vibratory for polishing this material. We will check the progress of the polishing about twice a day and stop when we are satisfied that the polishing has attained an optimum finish.
We provide separate instructions for rotary and vibratory tumbling below because some of our customers do not have both rotary and vibratory tumblers.
Recipe for Rotary Tumbling
Step 1: Coarse Grit (60/90 mesh) or Extra Coarse Grit (46/70 mesh)
Your objective for the first tumbling step is to grind away the bruises on the surface of these nodules. Many of these nodules have bruises that propagate 1/8 inch or more into the nodule. To obtain beautiful tumbled stones, tumbling during the coarse grit step must completely grind these bruises away.
Loading the barrel: We place agates into the barrel until the barrel is about 2/3 full. We do not add ceramic media at this time. Why no media? We want the tough agates to forcefully grind against one another.
How much grit and water? We use about 2 level tablespoons of grit per pound of nodules. We add enough water to almost cover the rocks.
How long to tumble? As long as it takes to grind away the bruises. These agates are very hard, and this grinding will require at least two weeks in coarse grit. It might take four weeks - maybe more. Every barrel of nodules is different, and the action of every type of tumbler is different. We recommend tumbling for a week, emptying the barrel, rinsing the nodules, and inspecting them to see if any bruises remain on their surface (see accompanying photos). If you see bruises, then return the agates to the barrel, add a fresh charge of grit, and tumble for another week. Repeat until you don't see bruises.
After each week in coarse grit, you should see less evidence of bruising. And, after each week in coarse grit, a little more banding and color from the interior of the nodules should be exposed.
Sometimes, when we know that a lot of tumbling will be required, we add 3 level tablespoons of grit per pound and allow the first tumbling step to run for two full weeks. This is not as effective as cleaning the rough and adding fresh grit each week, but we choose to do this because we believe that it saves labor hours.
A NOTE OF FACT: We use tumblers with barrels that turn at a rate of between about 20 RPM and 60 RPM. If you are using a tumbler that is a lot faster than these, it is possible that your tumbler will add more bruises than it will remove. Just sayin'.
CLEAN-UP CAUTION: When cleaning your nodules, bowl, and media after each step, do not allow the spent grit and rock mud to go down a drain.

Barrel slurry dumped down the drain will harden like concrete.
Step 2: Medium Grit (150/220)
Put your cleaned rough back into the barrel. Do we use ceramic media now? Yes. We add used ceramic media from our media bucket. We want some small media in the interstitial spaces between the nodules. We also use media to bring the barrel up to about 2/3 full - which is operating capacity for the tumblers that we use.
Then we add about 2 level tablespoons of medium (150/220) grit per pound of material (nodules and media) in the barrel. We then add water until the water level is about 1/4" below the top of the rocks. Tumble for one week. One week will be enough time to smooth the surface of well-prepared agates. Don't count on the medium grit step to remove bruises that should have been removed in the coarse grit step.
Step 3: Fine Grit (500F)
After cleanup, inspect the nodules and remove any that have sharp spots that might produce scratches on other nodules during tumbling. Put the nodules and media back into the barrel. Then add 2 level tablespoons of fine grit (500F) per pound of material. Again, add water to about 1/4" below the top of the rocks. Tumble for one week. The nodules should now be very smooth and possibly starting to get a slight luster.
Step 4: Polishing in TXP
IMPORTANT: Make sure that your barrel and rough have been cleaned thoroughly. Any grit carried over from a previous step will likely ruin your polish. Place the rough in the barrel with two tablespoons of TXP polish for each pound of material in the barrel. Add enough water to almost cover the rocks and media. We let the nodules tumble in this polish for seven to ten days. You should have brightly polished agates at the end of this step.
Burnish If Needed: This material usually takes a great polish. However, burnishing it after the polish step can often improve the look of the stones. If you would like to try burnishing, full instructions can be found here.
Recipe for Vibratory Tumbling
Step 1: Surface Preparation
NOTE: We do not use coarse grit in our vibratory tumblers. It will reduce the life of our bowls. So we prepare the surface of Gray Banded Agate Nodules using coarse grit (60/90 mesh) or extra-coarse grit (46/70 mesh) in a rotary tumbler (see instructions above for this step).
If we have tumbled these nodules in a rotary tumbler using coarse (or extra-coarse) grit, once they are ready for the medium grit step, we run them in a vibratory tumbler for three days using 150/220 mesh grit.
If we did not have a rotary tumbler, we would run these nodules in a vibratory tumbler for two to four days in medium grit (about 1/2 tablespoon per pound of nodules and ceramic media) with enough water to make the grit stick to the rocks. We check the tumbler a few times per day to maintain this moisture level. After four days we wash the rough for inspection. We would repeat that step as many times as needed to remove all of the bruises from the surface of the nodules and make them completely smooth for the fine grit step.
Barrel slurry dumped down the drain will harden like concrete.
1) The media will fill the interstitial spaces between the nodules. A piece of ceramic media in those spaces will deliver grit and polish to a greater surface area of the nodules. Sanding and polishing can only occur when particles of grit or polish are caught between hard pieces of rough or media. Ceramic media adds more hard surfaces to the bowl.
2) If you fill a plastic bowl with 1/2" to 1 1/2" agate nodules and turn on the tumbler, those nodules can hammer against the inside of the bowl and spall tiny pieces of plastic from the inside of the bowl. Adding some small ceramic media to the bowl will fill the interstitial spaces between the nodules. Instead of bouncing nodules hammering the inside of your bowl, much of that energy will be used to vibrate the tiny pieces of media against the surfaces of the nodules, and that energy will help smooth and polish your nodules. Use that energy - don't waste it.
Clean the media, the nodules, the bowl and its lid thoroughly after this surface preparation step. During all steps of tumbling, do not allow the spent grit and rock mud to go down a drain.
Step 2: Fine Grit (500F)
The fine grit step for tumbling this rough in a vibratory tumbler is easy. Simply place the clean nodules and media back into the barrel. Then add about 1/2 tablespoon of fine grit (500F or 600F mesh) per pound of material, plus enough water to make the grit stick to the nodules. We then tumble for three days, checking a couple times per day to maintain a moisture level that causes the grit to stick to the rocks. Do not allow the spent grit and rock mud to go down a drain.
Step 3: Polishing in TXP
We clean the nodules, media, bowl and lid thoroughly before the polishing step. Flush with plenty of clean water. We then return the media and the nodules to the bowl. Then we add about 1/2 tablespoon of TXP Polish per pound of material and enough water to make the polish stick to the nodules as a milky coating. We tumble for at least two days, perhaps three, checking on the moisture level a few times per day.
We also check the progress of the polishing with each moisture check. We stop the polishing step when it seems that additional run time will not brighten the polish.
This agate can accept a super-bright polish. You should be able to accomplish one of the highest lusters that you have ever produced with your rock tumbler.
Burnish If Needed
This material usually takes a great polish. However, burnishing it after the polish step can often improve the look of the stones. If you would like to try burnishing, full instructions can be found here.
Tumbled Stones That You Will Be Proud Of!
We think that you will really like the tumbled stones that you make with these nodules. The hard agate easily polishes to a very bright luster. We don't think you will have any problems polishing them. But you might have problems with people trying to beg them from you.
BONUS IDEA: Make Cabochons and Slices
Some of these agates are so nice that people who cut cabochons pick ones with a premium color and pattern, and then cut them into thin slices for cabbing. The cabs are often nice enough to mount in a ring, brooch, pendant, or other piece of jewelry. This agate is very durable and will produce cabs with a super-bright luster.
Slicing the nodules into "rounds" using a small rock saw will produce wonderful discs with colorful concentric bands. These can easily be tumble-polished and used in a variety of jewelry and craft projects. When sliced thickly, they can be used as a pendant or a game piece. When sliced thinly, they can be used to make a pin, a pair of cufflinks, or a pair of earrings.
Customers also bought...

Large Ceramic Media

Small Ceramic Media
Standard Grit Kit