What To Do If Your Tumbler Barrel is Leaking
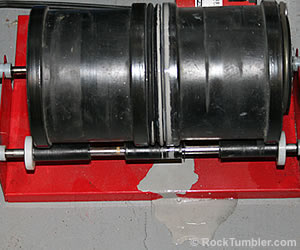
Muddy water on the base of your tumbler indicates a leaking barrel. Leaking is usually caused by a build-up of gas pressure in the barrel.
What Are You Tumbling?
The most common cause of a leaking tumbler barrel has nothing to do with the barrel and everything to do with the materials in the barrel.
A few materials generate gas when they are tumbled. A build-up of gas pressure in the barrel will cause the water in your barrel to seep out around the edges of the lid. Here is a list of some materials that can generate gas and cause leaks:
- man-made glass
- natural glass (especially obsidian)
- man-made slag
- pieces of metal
- pieces of metallic ore
If you don't catch the problem at that stage, pressure in the barrel can cause a few drops of water to seep out of the barrel between the lid and the edge of the barrel. Usually the operator of the tumbler will notice a small amount of muddy water on the metal base of the tumbler and stop the machine.
This is why, when someone contacts us about a leaking barrel, our first question is always... "What are you tumbling?"... "Is there even a few pieces of man-made or natural glass in the tumbler?"... If their answer is "Yes" we refer them to this article: Gas in the Rock Tumbler Barrel.
Now they know why their barrel is leaking. There is usually nothing wrong with their barrel.
A practice that we do ourselves and recommend to everyone is to visit your tumbler about once a day to so how it is running. If you see drops of muddy water on the base of the machine or if the bottom of the barrel is bulging outwards, then there is likely pressure building up in the barrel.
If pressure is allowed to build up, it could reach a level that is high enough to push the lid out of the barrel.
What Else Is In The Barrel?
People often add other things to their tumbler barrel - such as borax, soap, liquid detergent, clay and more. Some of these materials can also be responsible for a build-up of gas in the tumbler barrel.
We strongly recommend against using these materials. (The only exception is that we use a small amount of soap for a short period of time when burnishing.) Rocks can be tumbled successfully without any of them.
If you really want to try adding these materials to your tumbling, please visit your tumbler once or twice per day the first few times you use them. When you visit, be on the look-out barrels with bulging bottoms or seeps of water around the lid of the barrel. Once you use a material a few times with no problems, then it is probably safe to use with a little less caution.
Now let's consider your barrel... how it is cleaned, how it is maintained, and its physical condition.
Seven Reasons Why Your Barrel Might Be Leaking
Most rock tumbler leaks are easy to fix. The leak almost always occurs where the lid and the barrel are in contact with one another. The most common causes of a leak there are listed below in their approximate order of frequency.
- Debris on sealing surfaces of the barrel or lid
- Lid is not properly seated
- Lid with rough edges or cracks
- Lid is not tightly secured
- Damaged lid gasket
- Lid is worn out
- Damaged barrel
Seven Fixes for Rock Tumbler Leaks
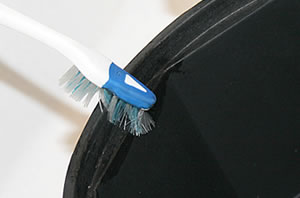
The most important place to clean a rotary tumbler barrel is the rim where the lid seats. We use a toothbrush to scrub the rim of the barrel and the outside edge of the lid. Spend 30 seconds on this and you will rarely have a leak.
1) Debris on the Sealing Surfaces of the Barrel or Lid:
Small particles of grit or debris often cling to the rim of the lid or on the recessed part of the barrel where the lid seats. Water can escape in the tiny space produced by these particles. This is the most common cause of a rock tumbler leaking - just one drop of water at a time. Here's how to fix it.
Simply open the barrel and pour the contents into a container. Then, thoroughly rinse and scrub the barrel until every speck of grit and rock has been removed. Now, get a used toothbrush and thoroughly scrub the edges of the barrel lid and the part of the barrel where the lid seats (the accompanying photo shows where this scrubbing needs to be done). Make sure to thoroughly scrub the entire edge of the lid and the entire recessed part of the barrel where the lid seats. Just one speck of grit on either of those sealing surfaces can cause a leak.
Then, carefully pour the grit and rock back into the tumbler barrel, being very careful not to spill anything on the newly-cleaned rim. Tiny pieces of grit that are too small to see can cause a leak. Then, replace the lid and place the barrel back onto the tumbler.
Thirty Seconds of Prevention: To prevent this problem in the future, we spend 30 seconds thoroughly scrubbing the rim of the barrel and the edge of the lid every time we change our tumbler. Since we started doing this, we have had very few leaks.
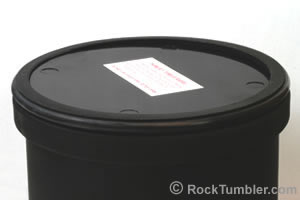
This image shows a lid that is not completely seated in the barrel. Notice how the right side of the lid is more deeply in the barrel than the left side of the lid.
2) Lid Is Not Properly Seated:
Sometimes the problem is this simple. When the lid was positioned, or secured by a retainer ring or threaded nut, it was either not straight or it was not firmly against the sealing surface of the barrel.
This fix requires emptying the barrel as described above, cleaning the sealing surfaces, returning the rocks and grit back to the barrel, and replacing the lid - and making sure it is straight before placing it on the tumbler.
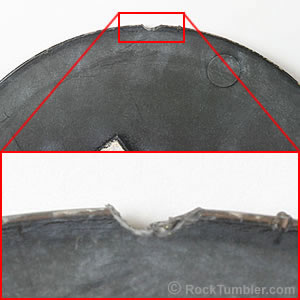
This image shows a lid with what appears to be minor damage - but a closer look shows that it could easily cause a leak.
3) Lid With Rough Edges or Cracks:
Some rock tumblers have a plastic or fiberboard lid. A rough edge on the lid can be a manufacturing artifact, or it can be caused if a lid is accidentally dropped or scraped against a hard object.
This problem can usually be solved by very lightly sanding the lid edges with extra-fine sandpaper. Don't sand so much that you round the edges of the lid. Just give it a very light rub on the upper and lower edges of the rim. Lid roughness can often be detected by rubbing a finger or a piece of fine cloth along the edges of the lid - the cloth will snag on the rough spot, a finger might feel it.
Wash the lid and the barrel before you put the tumbler barrel back together. If a light sanding does not solve the problem, try it again. If that doesn't work, or if the lid is cracked or badly damaged, a new lid is probably needed.
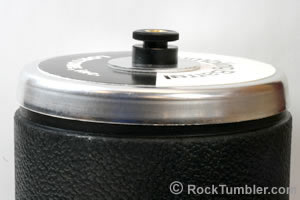
It is easy to tell when the outer lid on a Lortone barrel is not tightened down all the way.
4) Lid Is Not Tightly Secured:
Many tumbler lids are secured by rubber retainer rings, wing nuts, or threaded nuts. Sometimes these are not tight enough to prevent leaks. Rubber retainer rings can stretch and become ineffective. Nuts not tight enough can make an incomplete seal. Care must also be taken not to overtighten, which can lead to a deformed lid and/or deformed barrel, which is another cause of leaks. Sometimes a new retainer ring is needed when the original ring has lost its ability to hold the lid securely.
5) Damaged Lid Gasket:
Many tumblers have a rubber lid gasket that serves as the sealing surface between the lid and the barrel. They can have cracks along their edges that can leak. Or, a small hole in the center of the gasket can allow water to escape from the barrel and cause a leak. These gaskets are inexpensive and easy to replace.
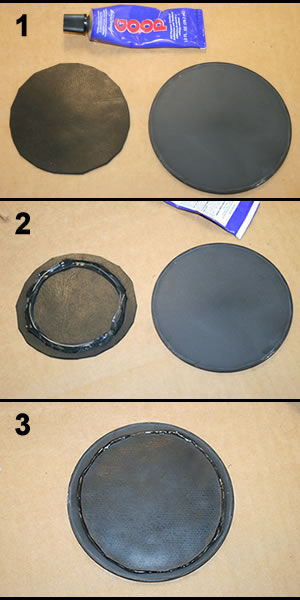
We reinforced the inside of a Thumler's tumbler barrel lid by gluing a thin circle of sheet rubber to the back of the lid using "All Purpose GOOP". This lid did last longer than an unreinforced lid. We learned this tip from Steve Hart's book, titled Modern Rock Tumbling. (We did learn that the sheets made from particles of recycled rubber are unsuitable for this purpose. They don't last through one tumbling cycle. You need a real sheet of rubber.)
6) The Lid Has Worn Out:
All rotary tumblers experience wear on the lid and will require a periodic replacement of the lid (or the lid gasket) over time.
This is normal.
As the tumbler runs, grit and rough scrape against the inside of the lid. Over time, the moving grit and rough will slowy wear the lid thinner and thinner. The most wear occurs in the center of the lid. If not checked and replaced, the lid will eventually develop a hole and a leak in the center of the lid. If you don't catch this in time a mess will occur.
Every day we have several tumblers running at our office turning barrels for the A-R1 and A-R2 tumblers. From our experience, a lid usually lasts a few months to several months - depending upon what you are tumbling and how you fill the barrel.
To extend the life of our tumbler lids and avoid spills we:
Avoid Overfilling the Barrel: The most important thing that we do to extend the life of our tumbler's lid is to avoid overfilling and tightly packing the barrel. Barrels should be filled less than 2/3 full with pieces of rock that are loosely packed. Loading a barrel full of tightly-packed stones is the best way to drill a hole in the lid.
Avoid Tumbling Large Rocks: Less wear occurs on your lid if you are tumbling small pieces of rough (under about 1 1/2 inch across). The most abrasive materials are large pieces of rough that are angular in shape and very hard. These include quartz and chalcedony (agate and jasper). Angular pieces of rough over 2 inches across cause the most wear on a lid.
Lid Inspection: Before we place a lid on a tumbler barrel we press in the center of the lid with firm finger pressure. With experience, you will be able to tell if a lid is wearing thin. It will be flexible in the center. We usually have an extra lid on hand to replace a lid that has worn thin.
Steve Hart, the author of Modern Rock Tumbling, explains how to significantly prolong the life of tumbler lids in his book. We followed his suggestion and show the results in the accompanying photos. Here is what we did...
1.
We cut a piece of 1/8" gasket rubber into a circular shape, about 1 inch in diameter smaller than the size of our lid. If you have a small tumbler, you can protect a lot of lids with a 12" x 12" sheet.2.
We got a tube of General Purpose GOOP and squeezed a thin circle of GOOP around our rubber circle. You can find Amazing GOOP here.3.
We placed the circle of rubber onto our tumbler lid and gently pressed around its edges until the GOOP squeezed out around its circumference - and allowed it to dry overnight.4.
One caution... the rubber sheets made from pressing together shreds of recycled rubber are unsuitable for this purpose. They don't last through one tumbling cycle. You need a real sheet of rubber.)7) A Damaged Barrel:
This is a common problem in barrels that are several years old, or barrels that have been stored in a hot or cold location or in direct sunlight. Age or exposure to heat, cold, or sunlight can cause the rubber of the barrel to develop tiny cracks or deform.
Cracks can often be detected by tracing your finger around the sealing surface of the barrel or doing the same with a soft cloth. You might feel damage with your finger, or the soft cloth might snag. The damage might also be visible if you flex the barrel rim slightly. This problem can only be solved with a new barrel.
Rarely, a well-used barrel will develop a hole in the bottom. The hole will usually develop in the center of the base of the barrel. That is the concentrated point of friction that occurs when a barrel full of rocks is turning. The solution for this, unfortunately, is a new barrel.
We Hope You Solved Your Leak!
We hope that one of the solutions above has fixed your leaking barrel. Most of the time the leak can be fixed without spending any money.
When that isn't possible, the small cost of a new lid, lid gasket, retaining ring, or barrel nut can usually stop the leak for a small cost. A new barrel is rarely needed.
Happy Tumbling!
RockTumbler.com Authors
 |
Hobart M. King has decades of rock tumbling experience and writes most of the articles on RockTumbler.com. He has a PhD in geology and is a GIA graduate gemologist. He also writes the articles about rocks, minerals and gems on Geology.com. |

