Burnishing Tumbled Stones or Glass in a Tumbler
In this video we demonstrate how to do the burnishing step for tumbled rocks or tumbled glass. The burnishing step involves running the rocks for a few hours in a heavy soap bath. It can really improve the luster of your polished stones.
What is Burnishing?
Most tumbled stones or tumbled glass that have been polished in a rock tumbler look pretty good at the end of the polishing step. However, there is one more step that will, in some cases, significantly improve their luster and really make them shine. That step is known as "burnishing". It involves running the stones in a heavy soap bath for about 30 minutes to about one hour.
The Buffing Test
To determine if burnishing will improve the luster of your polished stones or tumbled glass or whatever you have tumbled you can perform the "buffing test".
That involves rubbing one of the stones very rapidly on a soft piece of cloth. You can easily do that by rubbing it on the sleeve of a flannel shirt, or on a t-shirt, or on the leg of your jeans.
Pick a nice flat surface on one of your stones and study it for a moment to become familiar with its luster. Then rub it very rapidly on the soft cloth for fifteen to twenty seconds - enough time to build up a little heat. Then examine the flat surface to see if the luster improved. If it improved then a short burnishing should improve the luster of the rocks.
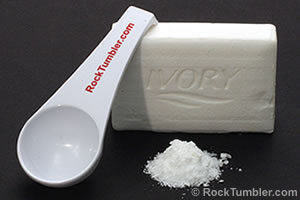
Burnishing in a Thumler's U-V10 vibratory rock tumbler is quick and easy. Fill the barrel to capacity with your stones. Add polished media if you need filler (brand new media or rough ground media might scratch your stones). Add ten to twelve tablespoons of water and about one tablespoon of finely grated Original Ivory bar soap (use other soaps at your peril). Allow the rocks to tumble for 30 to 60 minutes. Once the rocks are tumbling in a thin soap, cover to prevent evaporation.
Hard Water / Soft Water and Burnishing
We have lived in numerous locations and have tumbled rocks using water from wells and several municipal water supplies. From that experience we believe that rocks tumbled in "hard water" (water that contains a significant amount of dissolved calcium and magnesium) can often have their appearance improved by burnishing.
The first time we tumbled rocks in one of the communities where we lived, we were very disappointed with the results. The rocks had a very smooth finish that looked perfect under a 10x magnifying glass, but they did not have a bright shine.
So, we cleaned our tumbler and ran the fine grit and polishing step again. Same results. We then did the "buffing test" described above and realized that the rocks needed burnishing. After a short burnishing step the rocks looked great.
Today we live in a location where, right out of the tumbler our rocks look fine. However, a short burnishing step sometimes makes a noticable improvement. So, we suggest trying the burnishing step, no matter where you live to see what happens. You might be delighted.

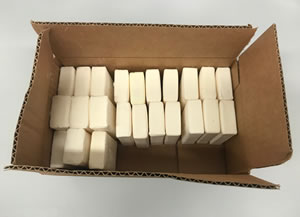
Grating Ivory Soap right out of the wrapper does not work very well. So, we unwrap several of bars of Ivory Soap, place them in a cardboard box, place the box on shelf, and forget about it. It grates wonderfully after drying for a few months.
Preparing to Burnish
Place your polished stones in a perfectly clean tumbler barrel. Be sure that the barrel is 2/3 full - or enough that the stones will not produce excessive tumbling action.
If necessary, add clean, broken in, ceramic cylinders if you don't have enough material to fill the barrel or if you need small particles as cushioning between large rocks. You want the burnishing step to be a very gentle tumble.
If you are using ceramic media be sure that it has been tumbled before. Brand new media often has some sharp edges that can scratch up your rocks. We sometimes add some plastic pellets to cushion the rocks while they are being burnished.

For burnishing we grate or very thinly slice a bar of Ivory Soap. We and add 1/2 tablespoon of soap slices for each pound of material in our tumbler. Some people use Borax, Tide or Dreft powdered detergent - about 1/2 tablespoon of soap powder per pound of rock.
In a rotary tumbler we add just enough water to almost cover the rocks. In a vibratory tumbler we add the normal amount of water and then about 20% extra. We always use warm water for burnishing because it will helps the soap dissolve faster.
In a rotary tumbler we add just enough water to almost cover the rocks. In a vibratory tumbler we add the normal amount of water and then about 20% extra. We always use warm water for burnishing because it will helps the soap dissolve faster.
Burnishing Soap
We use Ivory bar soap that has been grated or cut into very small or very thin pieces. Cutting the soap into small pieces enables it to dissolve quickly in the tumbler.
We use about 1/2 tablespoon of chopped soap per pound of material in the tumbler. Some people use a powdered laundry detergent for burnishing. Tide and Ivory Snow powdered detergents are reported to work well - about 1/2 tablespoon per pound of rocks. Some people use borax for burnishing and report good results.
We are really picky about the type of soap used. Many bar soaps, liquid soaps, and powdered detergents have added oils, abrasive particles, deodorants and other substances that you either don't need or don't want in your burnishing barrel.
They can either scratch your rock or attack the rubber of your tumbling barrel. That is why we limit our use to the original Ivory Soap in a bar.
How Much Water?
In a rotary tumbler we add enough water to almost cover the rocks. In a vibratory tumbler we add the normal amount of water and then about 10% to 20% extra. We always use warm water for burnishing because it will helps the soap dissolve faster.
The Burnishing Step
You don't have to run the burnishing step for a whole week. One hour in a rotary tumbler should be more than enough in a rotary tumbler. Thirty minutes to one hour in a vibratory tumbler is adequate.
Don't overdo it. Running too long might actually remove some of the polish from the rocks! When you are finished, open the tumbler and clean up your rocks. Wow! They should look great!
More Information About Tumbling
For more information about rock tumbling check out our detailed rock tumbling instructions, our rock tumbler resource page or Steve Hart's book titled "Modern Rock Tumbling".
Happy Tumbling!
RockTumbler.com Authors
 |
Hobart M. King has decades of rock tumbling experience and writes most of the articles on RockTumbler.com. He has a PhD in geology and is a GIA graduate gemologist. He also writes the articles about rocks, minerals and gems on Geology.com. |

