
How We Use Thumler's UV Mini Bowl, Thumler's UV-10, and Thumler's UV-18 Industrial Vibratory Tumblers
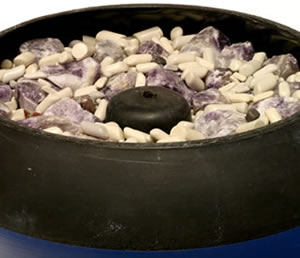
This photo shows a properly filled UV-10 tumbler bowl. Notice the level of material is just below the top of the bowl's center structure.
How To Properly Load the Bowl:
Use a Range of Particle Sizes: This is a good general practice when running any rock tumbler. Use a range of material sizes to create many points of contact between the particles in the barrel. Learn about particle size balancing. A range of particle sizes in the tumbler bowl will help the tumbler operate quietly. It will also help prevent bruising of the rough and reduce wear on the tumbler bowl. If you do not have small pieces of rough, you can use ceramic media to achieve a good range of sizes in the bowl.
How Full Should the Bowl Be? You should fill UV tumbler bowls to just below the top of the elevated center structure, as shown in the accompanying photo. Operating a tumbler with a partially filled bowl will make the rocks vibrate vigorously. All of that vibration will result in bruised rocks and extra wear on the plastic bowl.
Quieter Operation:
A couple of factors can cause UV-10 or UV-18 tumblers to operate louder than normal. But, if you follow the section above on how to properly load the bowl, you greatly reduce these issues.
Use a Range of Sizes: Running all large pieces of rough in the bowl is a common cause of excessive noise. The noise comes from large pieces of rough banging against each other and the bowl. Adding media or smaller material to the bowl will reduce the noise level greatly. It fills the empty space between the rough and absorbs impact.
Fill the Bowl Properly: The amount of material in the bowl affects how much noise the tumbler makes. A small amount of material in the bowl will cause it to be louder. We have found that loading the bowl to just below the top of the bowl's center structure works great. It reduces the noise by dampening the contact forces between pieces. It also creates a gentler tumbling action.
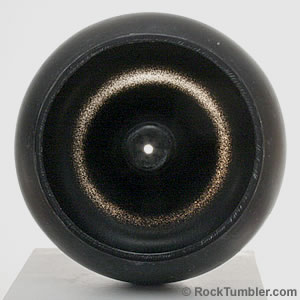
This barrel has been worn away so much that light can be seen through the bottom. If this goes undetected, it will cause a mess when it wears through completely while in operation.
Extend the Life of the Bowl
The black particles floating in the water after rinsing a UV-10 or UV-18 tumbler bowl are tiny pieces of the bowl. There are a few ways to reduce the amount of wear on the bowl. This will extend the life of the bowl and save you money.
Sharp Angular Rough: Most bowl wear happens in the first step of the tumbling process. The edges of sharp angular rough digs at the bowl much more than rounded material. Use a rotary tumbler and coarse grit for a few days to round the sharp edges before running the stones in a UV tumbler. If you prefer nice rounded stones, run them in a rotary tumbler until you are satisfied with the shape.
Not Filling the Bowl Full Enough: In a half-full bowl, the material can be tossed around aggressively. Material being tossed around will hit the sides of the bowl with more force than material gently tumbling in a full bowl. More force on the bowl equals more wear.
Using Coarse Grit: Coarse grit is not recommended for vibratory tumbling because the particles are too large to stick to the rocks and media. Coarse grit will also cause excessive wear on your plastic bowl.
| How Much Grit & Polish |
Mini Bowl |
UV-10 | UV-18 |
| Medium Grit | 3 Tbsp | 6 Tbsp | 10 Tbsp |
| Fine Grit | 2 Tbsp | 3 Tbsp | 5 Tbsp |
| Polish | 2 Tbsp | 3 Tbsp | 5 Tbsp |
How Much Grit and Polish is Needed?
Do not use coarse grit in a Thumler's vibratory tumbler! The particle size of coarse grit is too large to adhere to the rocks and media, and it will sink to the bottom of the bowl. Also, like very angular rock, coarse grit will wear the bowl out quickly due to its size, shape, and aggressive grinding ability.
In step 1, medium grit, we use 6 tablespoons in a UV-10 and 10 tablespoons in a UV-18. We let that run for 48 hours, checking the action in the bowl a couple of times a day and adding a little water if needed. At the end of 48 hours, we will rinse the material and recharge it with the same 6 or 10 tablespoons, depending on which tumbler we are running, and run it for another 48 hours. Repeat this process as many times as needed to get the stones shaped to your liking. For the second and third steps, fine grit and polish, we use 3 tablespoons in a UV-10 and 5 tablespoons in a UV-18. We run both steps for 2 to 3 days, checking the action a few times a day.
How Much Water to Use:
One of the most challenging parts of using a vibratory tumbler is determining how much water to use. The goal is to add just enough water to enable the grit to stick to the rocks and media. This amount of water allows the grit to circulate between the rock particles and cause the abrasion that shapes and smooths the rocks. During the polishing step you want just enough water that the water and polish form a milky liquid that coats every rock in the bowl.
If you add too much water, the grit will not stick to the rocks. If you add too little water, the same thing happens. If you add the perfect amount of water, you will be able to see grit on every rock and particle of media as the tumbler is running. Observe that in the video below.
We are often asked, sometimes rather angrily... HOW MANY TABLESPOONS OF WATER SHOULD I USE?... (These folks want a precise numerical answer - like 8 1/2 tablespoons.)
It is impossible to give a precise answer to that question. The amount of water required depends upon the size, and shape, and smoothness, and type of rock, that is moving in the bowl. If the bowl is full of very tiny, irregularly shaped particles with rough surfaces, then you will need to add two or three times more water than if your bowl is full of large, smooth, rounded particles.
When adding water, you must pay attention and observe. So we repeat the advice above: Add just enough water to enable the grit to stick to the rocks and media.
Another important thing... As your rocks are tumbled, the grit is going to abrade some very tiny particles from your rocks. These will absorb some of the water and create rock mud in the bowl. To keep that rock mud from becoming so thick that it interferes with the tumbling action, you will need to add a couple extra tablespoons of water at the start of your tumble, and then add a few more tablespoons of water as the rock mud thickens. We check our tumbler at least twice a day and add a little more water whenever needed. (Some people use a spray bottle for adding water. It works for them and you might want to try it too.)
Easy to Open While Running
The ability to easily open these tumblers while in operation is one of our favorite features. Vibratory tumblers should be checked two or three times a day. Why do you need to check the tumbler?
Check the Action in the Bowl: If the action seems slow, add a little water to thin the slurry and get the action back to normal. If the slurry is too thick, and adding water does not get the action back, you need to rinse the bowl and material. Then rerun the material in the same grit size. The more you check the tumbler, the less chance you have of the slurry getting too thick.
Relieve Gas Pressure: Opening the bowl relieves any gas buildup that may occur when tumbling. Most materials will not produce any gas buildup. However, natural and man-made glass will often create gas in the barrel. Gas buildup can cause problems if the pressure is not released.
Check the Progress of the Stones: Checking the material near the end of a step will save you from running the material too long or not long enough. Running too long will wear down the material more than necessary. It will also increase the chance of bruising the stones. Not running long enough will result in a poor final product and require the material to go through the tumbling process again.
Open the bowl, take a few pieces of material out and rinse them off. If these pieces meet your expectations, chances are the rest of the material will also. If you think they can improve with more time in the tumbler, do a quick rinse of the bowl and material. Then reload the bowl with the same grit size and run it until you are satisfied with the results.
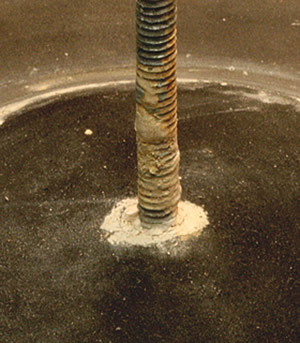
Above is a rusty center rod with caked-on grit slurry. It's likely that moisture has gotten under the foam pad and started to rust the base plate.
Protect Your Center Post:
After running our UV-10 for a few months, we noticed dried-up tumbling slurry and rust on the threaded center post. This rust and buildup caused some issues getting the wing nuts down the threaded rod. Oiling the post will protect it from rusting and will make it easier to clean off the tumbling slurry.
Start With a Clean Post: Before oiling the post, make sure it is clean. Not cleaning the rock mud off of the center post will damage the threads. If you have never oiled your post before, this may take some effort. We used soap, a toothbrush, and a rag the first time we cleaned our center post for oiling. If your center post has rusted badly, you might need to use a fine wire brush.
Oil the Post: Place a drop of oil above where the lid wing nut and washer sit. Then screw on a wing nut and use it to distribute the oil down the post. You may need to add a second drop of oil part way down the post to make sure that the post is protected all the way down to the base pad. We oil the center post every time we place a bowl on our tumbler.
Do Not Over-Tighten the Wing Nuts
The wing nuts and washers are used to hold the bowl and lid in place temporarily - not permanently. Once they are snug, give them another half turn and stop. The foam pads on the base plate and lid will help the bowl and lid stay snug.
If the bowl or lid start to depress or deform when tightening the wing nut, back it off a little. The bowl can crack if you over-tighten the wing nut and washer. You may also end up stripping the center threaded post by over-tightening.
Debris on the base pad can wear a hole in the bowl or the pad if not removed.
Keep the Base Pad Clean!
The tumbler's base pad is often overlooked, but it can cause problems if not checked and kept clean. A small piece of rough material pressed between the bowl and pad may do one of two things: 1) In a worst-case scenario, it wears a hole in the bottom of your bowl due to the constant vibrations when in operation. The end result will be a mess to clean up, plus the cost of a new bowl; and 2) It will tear the base pad, allowing moisture to get under it and causing the metal plate to rust. If the base plate rusts too much, it will need to be replaced. Take care of your base pad!
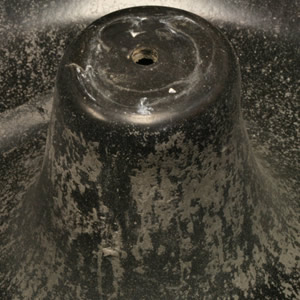
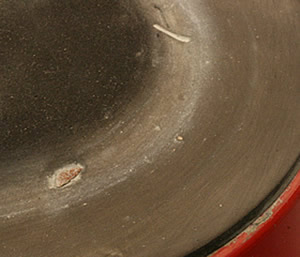
The gray material that you see in this barrel is dried rock mud. If this is not completely cleaned off, it will contaminate the next step of the tumbling process, and your rocks will not achieve their brightest possible shine.
Slurry Caked on the Bowl
Dried rock mud in the bowl will give it a gray appearance instead of the normal black color. If not removed, this dried rock mud will contaminate the next step of the tumbling process and prevent your rocks from getting a good polish.
Scrub the Bowl: Getting this caked-on rock mud can require vigorous scrubbing. Use a cloth or a sponge. Scrub the entire inside of the bowl. After you think it is clean, let the bowl dry. If you still see gray on parts of the bowl, you will need to scrub it again. Some people use a separate bowl for polishing to reduce the chance of contamination.
Clean the Foam Lid Pad: Slurry can and will get on the lid pad. If it is not scrubbed clean after every run, there is a chance of contaminating your next step. We always scrub the foam and its edges with a toothbrush to ensure that it is clean.
Make Rinsing the Bowl and Material Easier
Rinsing UV tumbler bowls and the material in them can be difficult. However, a little Dawn Dishwashing Soap can make it much easier.
Add Soap and Water: When a step nears completion, open the bowl, add a couple drops of Dawn Dishwashing Soap and a little water. Let the tumbler run for about 5-10 minutes with the soap and extra water. This will thin and loosen the rock mud. You will be surprised how much easier it is to clean the bowl and rough for the next tumbling step.
Your soap bubble level should be no higher than what you see in this video.
Burnishing Level and Soap
This goes hand in hand with the section about protecting your center post. Do not use an excessive amount of soap and water when burnishing. If the soap bubbles get on the center post, capillary action will cause the moisture to work down the post. If the moisture is not dried off, it will cause the center post to rust. If the moisture works down the shaft and gets under the base pad, your base plate may start to rust as well.
Clean Up Immediately!
If rock mud dries on the bowl, on the lid pad, or on the threaded rod, it will increase the difficulty of cleaning. If slurry dries on your stones, you might need to run that step again! These problems can be easily avoided by cleaning your stones and tumbler immediately after each step in the tumbling process.
We hope that you found this guide to be helpful.
Happy Tumbling!
RockTumbler.com Authors
 |
Hobart M. King has decades of rock tumbling experience and writes most of the articles on RockTumbler.com. He has a PhD in geology and is a GIA graduate gemologist. He also writes the articles about rocks, minerals and gems on Geology.com. |