White Quartz Tumbling Rough
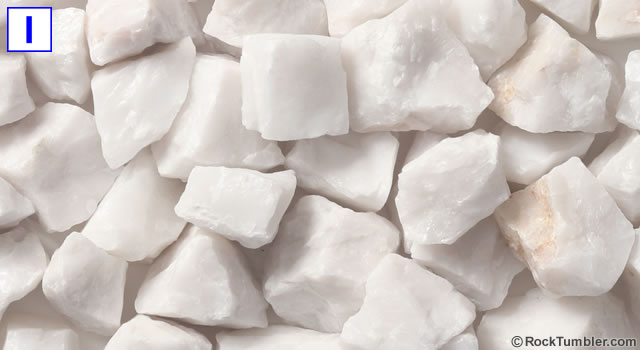
This photo shows a sample of the tumbling rough being sold on this page. It is pieces of broken white quartz that are about 1/2 to 1 3/4 inches in size (measured across their maximum dimension). Photographed dry. Click on the image for a larger view.
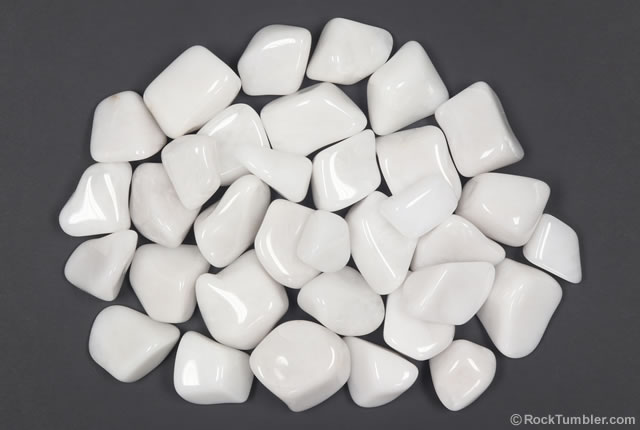
Here are some pieces of our rough white quartz that were tumbled in a rotary tumbler using the Rock Tumbling Recipe below.
White Quartz Tumbling and Cabbing Rough
 ,
,  , and
, and  What do they mean?
Size: most pieces are 1/2 inch to 1 3/4 inches
Description of the Rough
The white quartz (also known as snow quartz) being sold here consists of broken pieces of massive white quartz. Although quartz can be difficult to tumble with great results (because it tends to bruise in a tumbler), this material, because of its white color, does not show most of the small bruises and scratches that are typically produced in a rotary tumbler. In our opinion, it is a great "first quartz" for a person to tumble.
It is being sold in two-pound bags. Each bag contains mostly pieces of white quartz between 1/2 inch and 1 3/4 inches in size (if measured along their maximum dimension). This material is perfect for use in small to large tumblers using the instructions below.
INTERMEDIATE Rock Tumbling Recipe:
White Quartz in 1/2 to 1 1/2 inch pieces
Here are some things to consider before you start tumbling:
1) Very Hard: Shapes slowly in the tumbler. Quartz has a Mohs hardness of 7, and angular pieces of this size usually require at least two weeks of rotary tumbling to achieve a nice shape.
2) Sharp and Angular: We don't recommend using a vibratory tumbler for the initial shaping step of this material. Why? Because these sharp rocks will cause wear on the inside of bowls made of plastic or composite materials. We tumble this type of material first in a rotary tumbler to remove the sharp points and edges, and then switch to vibratory after the initial shaping is done.
Recipe for Rotary Tumbling
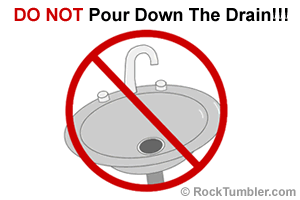
Barrel slurry dumped down the drain will harden like concrete.
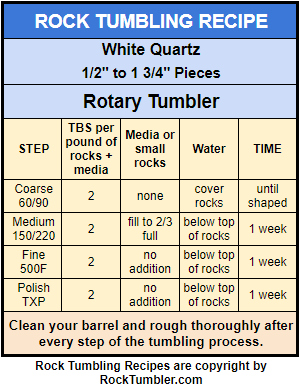
Coarse Grit Step: Fill your barrel about 1/2 to 2/3 full of rough. Do not overfill the barrel or add media. We want the sharp points and edges of these rocks grinding against one another to shape them during this tumbling step.
Then add about 2 level tablespoons of coarse (60/90) grit per pound of rough in the barrel. Add enough water to cover the rocks and tumble for seven to ten days. Open the barrel, wash the rocks, and decide if they need additional time. They need more time if their surfaces have not been completely smoothed.
The coarse grit step should remove surface irregularities, plus all of the sharp points and edges. One week in coarse grit will probably not be long enough to properly shape and smooth this material. If the stones need more time, reload the barrel as described above and tumble for another seven to ten days. Repeat again if needed.
Medium Grit Step: Place your rough back into the barrel then add enough media to bring the barrel level up to about 2/3 full. Add about two level tablespoons of medium (150/220) grit per pound of rough plus media, plus enough water to almost cover the rocks. Then tumble for about one week.
Fine Grit Step: After clean-up, place all of the rocks and media back into the barrel, add about 2 level tablespoons of fine (500F or 600F) grit per pound of rocks plus media, add enough water to almost cover the rocks, then tumble for about one week.
Polishing Step: After the fine grit step, clean the rough, the media, the barrel and the lid thoroughly in preparation for the polishing step. Then place the rock and the media back into the barrel, add two tablespoons of TXP polish per pound of rock, add enough water to almost cover the rough, then tumble for seven to ten days. Open the barrel and check to see if the rocks are super bright. If not, close the barrel and tumble for a couple more days. If the polish has not improved, you are finished. Burnish if needed.
Congratulations - You should have some brightly polished white quartz!
Recipe for Vibratory Tumbling:
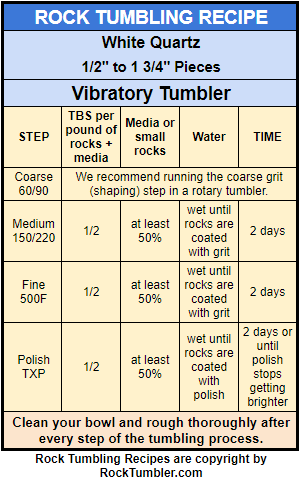
Coarse Grit Step: We do not use coarse grit in our vibratory tumblers. The grit particles are too large to stick to the rocks. Coarse grit is also very abrasive on plastic and composite vibratory bowls. So, we use a rotary tumbler for the initial shaping step. See the rotary tumbling instructions above.
Medium Grit Step: Quartz bruises easily, and after tumbling in rotary for two or more weeks, your stones probably have slight surface bruising. So, we want the stones to have a very smooth ride in the remaining steps of their tumble. We make that happen by mixing the stones in a 50:50 ratio with cylindrical ceramic media. A mix of sizes from our media bucket works great.
We fill the tumbler to operating capacity with a mix of stones and ceramic media. Then we add 1/2 level tablespoon of medium (150/220) grit per pound of rocks plus media. Then we add enough water to make the grit stick to the rocks and tumble for two or three days. Check a couple times per day and add water if the slurry begins to dry. After two days, or when the slurry starts to thicken, you will have resurfaced the stones and are ready for the fine grit step.
Fine Grit Step: After cleaning the stones, media, barrel and lid thoroughly, load the stones and media back into the barrel. Add about 1/2 tablespoon of fine (500F or 600F) grit per pound of rock plus media, then add enough water to make the grit stick to the rock. Tumble for two to three days, checking often to make sure that the mud is not getting too dry. When you have formed a thin mud, the stones have been resurfaced and they are ready for the polishing step.
Polishing Step: It is really important to clean the stones, media, bowl, and lid foam before the polishing step. This prevents fine grit from contaminating the polishing step. Some people have a dedicated bowl for polishing to reduce the chance of contamination.
Do not add any more media at this point. Simply load your stones and media into the bowl, add about 1/2 tablespoon of TXP polish per pound of rocks, and enough water to make the polish into a thin milky slurry that sticks to the rocks.
You should see some shine developing on the stones during the first 24 hours. It should improve during the second day. Keep tumbling until the polish seems to stop improving. This quartz should give you a very bright polish.
Burnish if needed.
Congratulations! You should have some really nice white quartz!
Customers also bought...
Large Ceramic Media

Small Ceramic Media

Standard Grit Kit


