Botswana Agate Nodules - Spectacular!
One of our best-selling roughs ever!
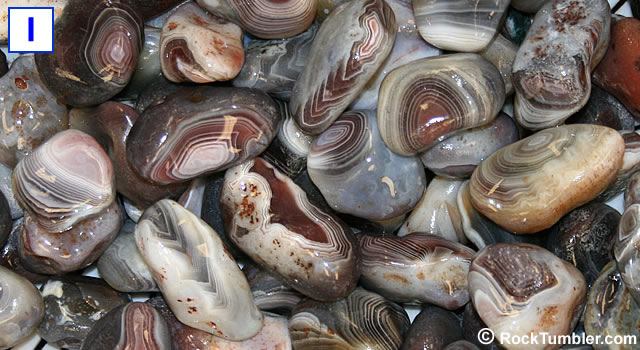
This image shows a 5-pound bag of Botswana agate nodules, dumped into a colander and sprayed with water to add a little luster and reveal their full color. Click on the image for a larger view. Wow! Look at those bands!
Banded Botswana Agate Nodules
(Tumbling or Cabbing Rough)
 ,
,  , and
, and  What do they mean?
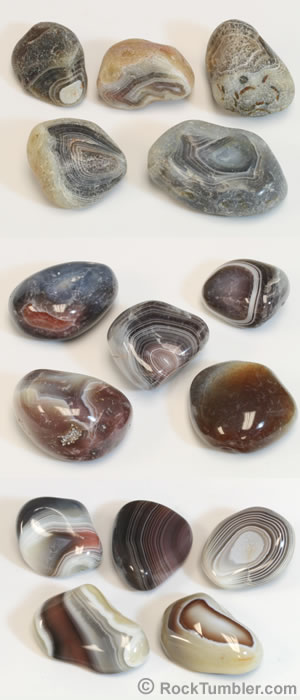
TOP FIVE STONES: These are rough nodules as we receive them. They have a dull appearance, and with a magnifying glass you can see a lot of tiny curved fractures descending into their interior. These are bruises that the nodules suffered in their natural stream/beach environment. These agates are really hard and really tough - so it will take some serious grinding to remove the fractures.
MIDDLE FIVE STONES: This is what they look like after we tumbled them for one week in a rotary tumbler using coarse grit and then proceeded through the polishing step. Phooey! The grinding wasn't deep enough. The nodules still have a lot of tiny fractures from the bruises descending into their interiors. We should have inspected them better before moving them to the vibratory tumbler. Back to coarse grit! Three tumbling steps, grit, polish, time and electricity wasted!
BOTTOM FIVE STONES: Wow! That's what we were looking for. Perfect Stones. All of the bruises are completely removed and the polished agates are spectacular. They have beautiful bands and bull's-eye structures - and they accept a super-bright polish if you spend the time needed to grind away the outer fracture surface. We tumbled them for three weeks in coarse.
Read more about tumbling stream- and beach- rounded roughs here.
MIDDLE FIVE STONES: This is what they look like after we tumbled them for one week in a rotary tumbler using coarse grit and then proceeded through the polishing step. Phooey! The grinding wasn't deep enough. The nodules still have a lot of tiny fractures from the bruises descending into their interiors. We should have inspected them better before moving them to the vibratory tumbler. Back to coarse grit! Three tumbling steps, grit, polish, time and electricity wasted!
BOTTOM FIVE STONES: Wow! That's what we were looking for. Perfect Stones. All of the bruises are completely removed and the polished agates are spectacular. They have beautiful bands and bull's-eye structures - and they accept a super-bright polish if you spend the time needed to grind away the outer fracture surface. We tumbled them for three weeks in coarse.
Size: mostly 1 to 2 inch pieces
About This Rough
We were surprised to get these! Beautiful stream-tumbled agate nodules from the country of Botswana in southern Africa. They are spectacular, colorful, pre-shaped by a stream or a beach and ready for your rock tumbler. They are hard, translucent, banded agates that accept a very bright polish. Some of this material is full nodules. Some is partial nodules that have been rounded and smoothed by stream tumbling.
We like these nodules because most of them contain concentric-banded agate in contrasting colors. When polished you will find thin translucent bands in brown, cream, reddish brown, pink, white, gray and other colors.
Some people call this material "gray agate" but that name is a total understatement. Tumbling will reveal interesting "eyes" lurking below the rind of a few of these nodules. A few might have solid crystal quartz centers.
We sell these nodules in five-pound bags. You might find pieces as small as 1/2 inch, but most of the weight will be nodules that range in size from about 1 inch up to about 2 inches. There are an estimated 10 to 15 agates per pound depending upon their size and shape. Some agates are whole, some agates are portions, some have a window exposing the beauty of their colorful inner banding. The photo at the top of this page is of wet agate nodules from a representative bag.
Some of these agates are so nice that people who cut cabochons might pick ones with premium color and pattern to slice and cab. The cabs will be nice enough to mount in a ring, brooch, pendant or other piece of jewelry.
Slicing the nodules into "rounds" on a small rock saw will produce wonderful disks with colorful concentric bands. These can easily be tumble-polished and used in a variety of jewelry and craft projects. Thickly sliced they can be used as a pendant or a game piece. Thinly sliced they can be used to make a pin, a pair of cuff links, or a pair of earrings.
INTERMEDIATE Rock Tumbling Recipe:
Botswana Agate (1 to 2 inches)
When tumbling this Botswana agate two things should be considered:
1) More Time: Patience will pay off with better end results. Botswana agate is very hard and grinds slowly. It is harder than most jaspers and most petrified woods. Your job during the coarse grit step is to grind away the ENTIRE outer surface of these nodules.
You must grind down completely through the bruises that this material received in its natural environment. Take a look at the accompanying photos. Read the captions carefully. From experience we can tell you that it will take a two to three weeks minimum. We suggest running in coarse grit for two weeks, then checking to see if you have removed the surficial bruising. Study the accompanying images and read the captions carefully.
2) Media Needed: This material is in pieces that range between 1" and 2" in size. For that reason, we add about 25% ceramic media to fill the voids between the larger pieces of rough. The cylindrical shape of the ceramic media acts like a roller bearing and gives the rocks a smooth tumbling action in the barrel. The small pieces of media also deliver grit to all surfaces of the rough.
| Using Small-Size Rough Instead of Media: Some people use small pieces of rough instead of media. This can work well if your small rough meets two requirements: 1) the small pieces of rough must be blocky or rounded in shape to produce a good tumbling action - thin or flaky pieces will break up quickly and might not produce a smooth tumbling action; 2) the small pieces of rough must have a hardness that is equal to or greater than the rough that they are tumbled with - if they are softer they will tumble into mud before their job has been done. |
Recipe for Rotary Tumbling
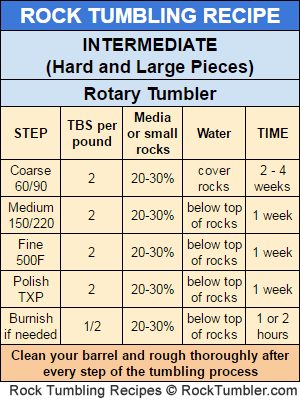
Coarse Grit Step: Fill your tumbler barrel 2/3 full of rough and media (we use about 25% media and 75% rough). Then add 2 tablespoons of coarse (60/90) grit per pound of material in the barrel. Add enough water to cover the tops of the rocks. Run the material in coarse grit for 2 weeks. After two weeks check your material. If you are happy with the shaping move onto the medium grit step. If more shaping is needed, clean the rough and start tumbling again with a clean barrel and fresh grit.
At the end of all steps in the rock tumbling process, make sure to clean your rocks and barrel to reduce the chance of coarser grit contaminating the finer grit steps. This cleaning is especially important before you begin the polishing step.
| How Many Weeks In Coarse? A little judgement will be needed because every barrel of rocks will be different. They have different sizes, different shapes, different compositions. And, tumblers come in many different sizes, different shapes and run at different speeds. The human brain must be used to get optimal results. You will become wiser and get better results through paying attention and gaining experience. |
Medium Grit Step: Put your cleaned rough back into the barrel. Then add 2 tablespoons of medium (150/220) grit per pound of material in the barrel. If the barrel isn't at 2/3 full, add a little more media to bring it up to operating capacity. Add water until it is just below the top of the rocks. Tumble for one week.
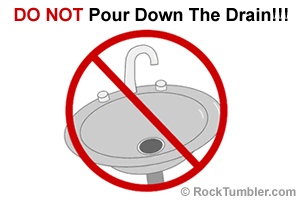
Barrel slurry dumped down the drain will harden like concrete.
Polish Step: IMPORTANT: Make sure that your barrel and rough have been cleaned thoroughly. Any grit carried over from a previous step will likely ruin your polish. Place the rough in the barrel with two tablespoons of TXP polish for each pound of material in the barrel. Add enough water to almost cover the rocks and let it tumble for one week. You should have polished rocks at the end of this step.
Burnish If Needed: This material usually takes a great polish. However, burnishing it after the polish step can often improve the look of the stones. If you would like to try burnishing, full instructions can be found here.
Vibratory Tumbler Recipe:
1" to 3" harder rough
Coarse Grit (60/90 Mesh):
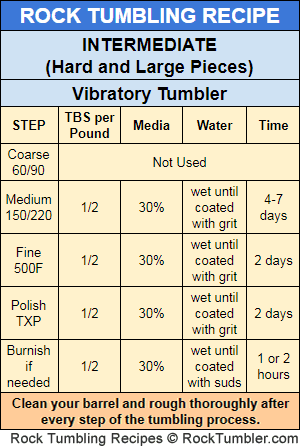
Coarse grit is not used in a vibrating rock tumbler.
Medium Grit (150/220 Mesh):
Due to the size of this material it is recommended that you begin with a minimum of 30% ceramic media. The use of this media will aid in the tumbling action in the barrel and help deliver grit to all surfaces of the rough
After you have your bowl loaded to the manufacturer's recommended level add 1 tablespoon of grit for every two pounds of material, including the media, in the bowl. While the tumbler is running, slowly add water until the material has a thin coat of wet grit and the tumbling action is smooth and fast in the bowl.
Check the bowl every 8-12 hours to ensure the action is still good. If the action has slowed, add water a little at a time until the action is back to normal. If the mud gets too thick you will need to do a complete rinse of the material and bowl. After rinsing, add fresh grit and water and start tumbling again. You are done with medium grit when you are satisfied with the shape and smoothness of the stones. Usually 4-7 days for us with this material. Give the material and bowl a thorough cleaning before moving on to fine grit.
Fine Grit (500F Mesh):
Place your material back in the tumbler bowl, then add enough polished ceramic media to bring the load up to the manufacturer's recommended operating level. Add one tablespoon of grit for every two pounds of material in the bowl. Then, turn the tumbler on and slowly add water until the material has a thin coat of wet grit and the tumbling action is smooth and fast in the bowl.
Open the bowl every 8-12 hours to check the action is still good. We usually run fine grit for 48 hours. Thoroughly clean the bowl and material before moving to the polishing step.
Polish (#61 Rapid Polish or TXP):
Place the cleaned material back in the bowl. If needed, add ceramic media that has been previously polished, to bring the bowl up to the manufacturer's recommended operating level. Add one tablespoon of polish for every two pounds of material in the bowl. Turn on the tumbler and slowly add water. Stop adding water when the material has a thin coat of wet polish and the tumbling action is smooth and rapid.
Like the previous grit steps, open the bowl every 8-12 hours to check the tumbling action. Add water if it has slowed. We have found that 48 hours is usually all the time you need to get a good polish in a vibratory tumbler. Any more time than that and you run the risk of damaging / bruising the material.
Burnish If Needed:
This rough will usually take a great polish. However, burnishing this material after the polish step can often improve the look of the finished stones. If you would like to try burnishing to see if it improves the look of your polished stones, full burnishing instructions can be found here.
Tumbled Stones That You Will Be Proud Of:
We think that you will really like the tumbled stones that you make with these nodules. Their hard agate easily polishes to a very bright luster. We don't think you will have any problems polishing them. But you might have problems with people trying to beg them from you.
Finished Botswana Agate Tumbled Stones:
If you don't want to tumble this Botswana agate yourself, we usually have medium size (5/8" to 1") tumbled stones of this material for sale by the pound. You can find them here.
Customers also bought...
Large Ceramic Media

Small Ceramic Media

Standard Grit Kit


