
Polishing Marbles in a Rock Tumbler
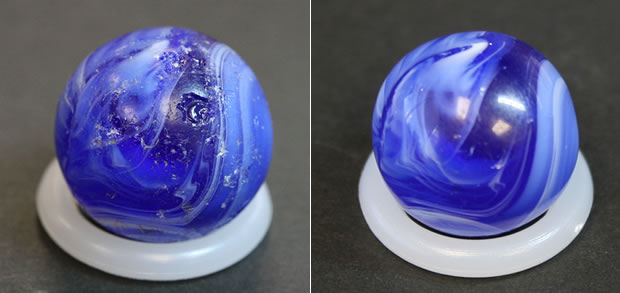
Before and after photos of a damaged marble that was sanded and polished in a vibratory rock tumbler. Can you tell that the polished marble on the right is smaller in size? The sanding required to remove the deep chips reduced the diameter of the marble by the depth of the chips plus the unseen fracturing beneath the chips times two (it reduced the radius by the depth of the chips plus unseen fracturing).
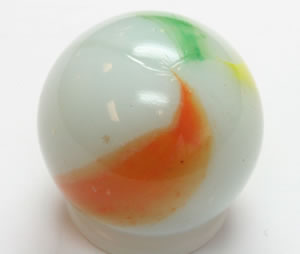
Every brand new marble, straight from the factory, has lots of tiny surface imperfections. These can be roll marks (like the one in the photo above) that are formed when a slug of glass is rolled into a sphere. They can also be tiny flat spots and glass smears that occur when the hot, soft, newly-rolled marble bounces down a track in the factory. All of these little factory marks will be removed if you polish a marble. Anybody who knows about marbles will be able to spot a polished specimen immediately if they look for these marks.
Can I Polish Marbles in a Rock Tumbler?
Lots of people ask us this question. Our answer is "Yes, you can polish marbles." In this article we are going to describe a method that we have used to successfully polish a few marbles. There are many other methods that can be used.
Should You Polish Marbles?
Some people use a rock tumbler to polish marbles that have light scratches and "hit" marks from being played with. Many people who collect valuable marbles will tell you that this should never be done. They would rather have a marble that shows signs of play - or even chips - than own a marble that has been polished.
So, before you polish a marble you have to determine what it will do to the value, and how your trading partners will view this marble. Serious marble collectors have the same dislike of polishing that furniture collectors have about refinishing and coin collectors have about cleaning.
And, there is one final thing to consider. While many types of glass can be nicely polished in a rock tumbler, other types of glass chip easily. So, it is possible that you will start tumbling your marbles and find that they get chipped in the tumbler. Always test-polish a few unimportant pieces before proceeding with your valuable items.
A few surface imperfections can be seen on the surface of this marble. Tiny creases in the glass, tiny flats, small impurity particles.
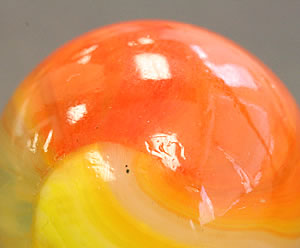
Defects of "Factory Fresh" Marbles
Machine-made marbles in absolutely mint condition usually have surface imperfections from the manufacturing process. They will have roll marks, straw marks, tiny creases in the glass and tiny flat spots that are formed as hot marbles are handled at the factory. A couple of examples are shown in the photos at right. Every machine-made marble has these markings and if you polish a marble these "factory markings" will be removed.
Anyone who knows about marbles will be able to spot a polished marble immediately with close examination.
Get a magnifying glass and carefully examine the surface of a "pristine" marble. You will see that the glass surface has many tiny marks.
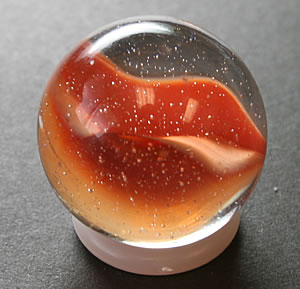
Most glass marbles contain trapped bubbles of air. When you sand and polish a marble in a rock tumbler you will remove a tiny layer of glass from the entire surface of the marble. That reduction in size will often cut into one or more of these trapped air bubbles. That open air pocket will be a clear signal that the marble was polished.
Small Defects Become Flat Spots
If you run marbles in a rock tumbler you run the risk of producing flat spots or misshapen marbles. Here are some situations that can cause them...
A) If a marble has a chip, it can develop into a flat spot during polishing. Small diameter chips usually round over, but chips larger than the head of a small straight pin will usually make flats. That measurement is from the maximum width of the chip.
B) If a marble has a bubble at shallow depth under the surface, sanding through the overlying glass will open the bubble and a flat spot can develop - especially if the bubble is large.
C) Some glass is softer than other glass and marbles that are not uniform in color usually have multiple types of glass with different compositions. If one glass is softer than another, flat spots or out-of-round marbles can develop.
Vibratory Rock Tumblers
We used a vibratory tumbler to polish our marbles. We have polished marbles in a Lot-o-Tumbler and a Thumler's UV-10. The vibratory was our choice (over a rotary tumbler) for a couple of reasons.
1) Most important is the ability to open the lid, pull out a marble, examine it and place it back into the tumbler with very little effort. Periodic examination of marbles while they are being tumbled is important because each of the marbles that you are tumbling will need a different amount of sanding. It is easy to check them in a vibratory tumbler. You can also check on them during the polishing step to determine when they are finished.
2) Vibratory tumblers have a gentler action. This reduces the risk of damage that could occur as the marble is tossed around the barrel of a rotary tumbler. In addition, the action of the vibratory tumbler will be less likely to turn a "chip" into a "flat spot" - but that can happen in a vibratory tumbler depending upon the size and shape of the chip.
Step 1
We sand the marbles in a Lot-o-Tumbler or a Thumler's UV-10 for a few hours to a couple of days depending upon the depth of the chips and scratches on the marble. We use 150/220 silicon carbide grit as an abrasive with a small amount of water. Small scratches and chips are removed in a few hours. Deeper chips can require a couple of days - but often turn into flat spots. We open the lid, examine the marbles, remove any that are sanded to our satisfaction.
For general instructions on running a vibratory tumbler see our videos here... Lot-o-Tumbler or Thumler's UV-10.
When tumbling marbles, it is important to run the machine at its recommended capacity. We always run the marbles surrounded by small ceramic cylinders. These tiny ceramic pieces improve the tumbling action and since they are smaller than the marbles they will cushion the impacts between the marbles. This gentler action can prevent chipping on glass marbles - some types of glass chip very easily.
If you remove marbles during the process you can add ceramic cylinders to keep the bowl of the tumbler up to its recommended operating capacity. Small ceramic cylinders work best because they provide cushioning around the marbles.
Step 2
We thoroughly cleaned the bowl, marbles and ceramic cylinders. Then we ran them for about 12 hours, using 500 or 600 silicon carbide grit and a small amount of water.
Step 3
We thoroughly cleaned everything and ran using TXP Aluminum Oxide polish and a small amount of water. We ran this step until the marbles were polished to our satisfaction - usually only 12 to 48 hours. Burnishing is usually not needed. If you don't get a nice polish an hour or two of burnishing can produce a great shine.
Happy Tumbling!
RockTumbler.com Authors
 |
Hobart M. King has decades of rock tumbling experience and writes most of the articles on RockTumbler.com. He has a PhD in geology and is a GIA graduate gemologist. He also writes the articles about rocks, minerals and gems on Geology.com. |