
Phooey! My Stones Didn't Take a Nice Polish!
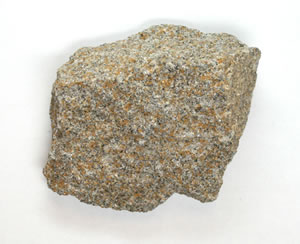
Gritty Rocks: This is probably the number one cause of a poor polish. Rocks such as sandstone, incompletely silicified jasper, most types of schist, most types of gneiss, rocks that have been weathered, and many other materials, will shed particles as they tumble. These hard particles will be like adding grains of coarse "grit" to the fine grit and polishing steps. Those pieces of "grit" will ruin the polish of every stone in the barrel. If you are tumbling a barrel of "mixed rough" or rough that was collected and is now being tumbled for the first time, suspect "gritty rocks" as a probable cause of a poor polish.
The Ingredients of a Great Polish
Beautiful tumbled stones with a fantastic polish do not happen by chance. They are produced by very careful and very deliberate choices and actions of the operator - the person who does the tumbling.
There's a lot more to rock tumbling than boiling an egg!
Producing tumbled stones with a great polish requires the eight ingredients below. If any one of these is missing, if any one is done poorly, you will probably not be happy with the results - and you just wasted a lot of time - and the money that you spent on electricity, grit, polish, and rough.
Eight Ingredients of a Great Polish
- Quality rough materials
- Proper rough preparation
- Cleanliness in tumbling
- Proper sizing and cushioning
- Quality abrasives and media
- Tumbling for the proper amount of time
- A tumbler that tumbles stones gently
- A deliberate operator with the required knowledge, skill, and intelligence
Reflect on how the elements of #8 influence the choices made in #1 through #7.
That is why we have prepared a rock tumbling library and invite you to read it. Because, the more you know about rocks, about tumblers, and about the supplies that you will be using, the greater your probability of success.

The first step and most important step in rock tumbling is finding rocks that will perform well. There are so many things that can be wrong.
1) Quality Rough Materials
Most rocks are not suitable for rock tumbling. That includes many rocks that are offered for sale as "tumbling rough".
Rocks that perform well in a rock tumbler usually have a smooth, uniform texture that is free of fractures, voids, and soft spots. They are also rocks that will not shed particles in the tumbler. Good tumbling rough must also be hard enough to accept a bright polish and tough enough to survive the harsh environment of the tumbler.
The best materials for tumbling are jaspers, agates and other varieties of chalcedony. These rocks are generally inexpensive, colorful, and they easily polish to a bright luster. They are also durable enough to survive tumbling with very little damage.
What types of rough should you avoid? We explain problem roughs in the sections below...
Rocks That Cause Problems
GRITTY ROCKS:
Rocks that shed particles in the tumbler are a huge problem.
Add one gritty rock to a tumbler barrel, and it is unlikely that you will get one nicely polished stone out of that entire batch. Why? Because as that gritty rock is tumbled, the impacts in the barrel will dislodge small particles. Those particles will be like pieces of coarse grit in the polishing step. Inspect your rocks before tumbling, and remove any that have a "gritty" texture. Discard them.
Very few sedimentary rocks can be tumbled. Gneiss, schist, and quartzite that are not highly metamorphosed are also problem rocks in a tumbler. Weathered rocks always perform poorly. The grains in these rocks are usually poorly bound together, and they usually break apart in a tumbler.
Tip: If you can rub two rocks together and produce tiny grains, then the rock that's shedding the grains should not be placed in a tumbler. It will ruin the polish of every rock in the barrel! Don't be wimpy. Rub these rocks together vigorously to test them. Look for tiny particles being dislodged.
Tip: When you finish the polishing step, remove the rocks from the barrel by hand and allow the polish slurry to remain in the barrel. Allow it to settle for a few minutes. Then probe the bottom of the barrel to see if any "gritty" particles settled out.
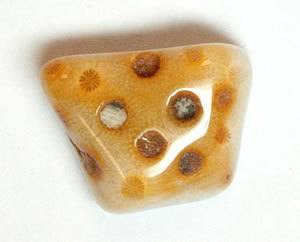
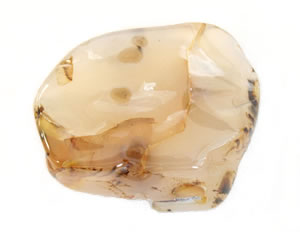
Some rocks have voids or cavities that cause problems. When polished, these voids are unsightly blemishes on the rock. The voids and cavities can also trap pieces of coarse grit that are difficult to wash out, and they can contribute gritty particles to the polishing step. This piece of agatized coral has grit trapped in the voids.
ROCKS WITH VOIDS:
Rocks with small cavities or pores usually do not perform well in a tumbler. Pieces of coarse grit will enter those voids and not make their way out until you have them in the polishing step. An inspection by eye or with a hand lens can reveal these voids and the presence of contamination.
Many people can tumble rocks with grit-trapping voids with good results. These people often clean and burnish their rocks after each step of the tumbling process. The burnishing step involves tumbling the rocks for an hour or so in a soap or borax step. This step sometimes can liberate the grit from from the voids.
It is very important to clean the rocks immediately after they are removed from the barrel - if they are allowed to dry, any trapped grit in the voids can be glued into place by traces of rock mud.
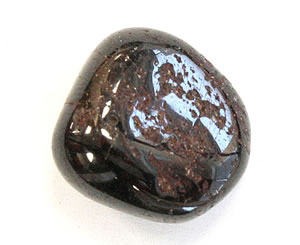
This piece of red garnet has a large number of soft inclusions. The included mineral wears away, leaving a polished surface with numerous ugly pits. Large garnets often have an enormous amount of included material.
ROCKS WITH INCLUSIONS:
Inclusions are tiny pieces of foreign mineral material in a rock. If these inclusions have a different hardness than the rock, a poor polish will usually result. If the inclusions are softer, they will wear away in the tumbler, producing pits and cavities in the polished stone. If the inclusions are harder than the surrounding rock, they will be liberated during the tumble and act like coarse grit, scratching up every other rock in the barrel.
Garnet often contains an enormous number of tiny mineral inclusions. These inclusions can make it impossible to polish into nice tumbled stones. The surface of the tumbled stones will either have a large number of ugly pits, or a surface that has so many tiny surface-reaching inclusions that it does not reflect a large amount of light. Garnet can be tumbled into beautiful tumbled stones, but finding gem-quality rough at a price that you are willing to pay is a challenge. More information here.
Rough "ruby" and "sapphire" are often offered for sale as a "tumbling rough". We have purchased these materials many times from many vendors. Our experience is that they have always been of a quality that cannot be polished in a rock tumbler. Like garnet, corundum (the mineral of ruby and sapphire) also suffers from being heavily included. It also suffers from cleavage and parting. These two properties cause planes of easy fracturing within the mineral. Although the cleavage and parting might not cause the pieces to break, they cause the stones to have a rough surface, a "stepped finish", or so many surface-reaching fractures that a nice polish cannot be achieved.
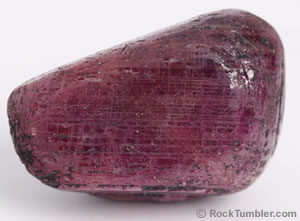
The horizontal features crossing this piece of tumbled corundum are where parting planes reach the surface of the stone.
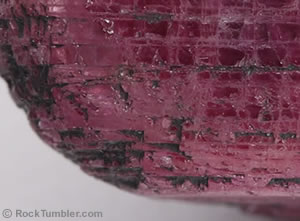
This photo is a close-up of the lower-left side of the stone in the photo above. You can see included mineral matter (black) within the parting planes. The combination of surface-reaching parting planes and included mineral matter prevents this corundum from achieving an attractive polish. Much corundum sold as "ruby" or "sapphire" tumbling rough has one or both of these problems.
Also notice how this corner of the stone is rough and jagged. As a stone like this is tumbled, small particles of the stone will break off to supply angular pieces of corundum to the barrel. These particles will act like Mohs 9 hardness grit and scrach every other stone in the barrel.
Also notice how this corner of the stone is rough and jagged. As a stone like this is tumbled, small particles of the stone will break off to supply angular pieces of corundum to the barrel. These particles will act like Mohs 9 hardness grit and scrach every other stone in the barrel.
HIGHLY FRACTURED ROCKS:
Rocks with a lot of fractures or parting planes are problematic in a tumbler. The tumbling action in the barrel often breaks them into tiny pieces. If they break during the fine grit or polishing step, the liberated particles can scratch up every other rock in the barrel. The fractures can also be places for particles of grit to hide and then escape during the polishing step to produce scratches.
MIXED BATCHES OF ROUGH:
One of the most common pieces of advice about tumbling is "tumble one type of rock at a time". People often write to us after they have tried to tumble a batch of rocks that contains stones that they collected from many different places and complain about getting a poor polish. In that situation, any one of the rocks in the barrel could be crumbling or shedding particles, and those particles are scratching every other rock in the barrel.
For that reason, it is best to tumble one type of rock at a time - then if you have problems, you don't have to test every rock in the barrel to see if it was the one shedding particles. If you don't have enough of one type of rock for a full barrel, then try a smaller barrel or use media (or some proven material) to bring the barrel up to good operating capacity.
JUNKITE:
Here is something that many people, especially those who are new to rock tumbling, do not realize.
Most rocks are unsuitable for rock tumbling.
That's right. Most rocks cannot be polished in a rock tumbler because of the reasons discussed above. Use what you learned above to examine your rocks in the field so you don't spend time and labor carrying them home, cleaning them up, and then being disappointed because they can't be polished.
WHEN BUYING TUMBLING ROUGH
Most people purchase their tumbling rough instead of collecting it in the field. Many of these people live in an area where nice tumbling rough cannot be found. So, they buy from online sellers like RockTumbler.com, they buy at a local rock shop, or they buy at gem and mineral shows.
When you make these purchases, examine the rocks closely if you are at a show or shop. If you are buying online, you can only look at whatever photos are offered. If you have questions about the rough or if you have never tumbled that type of rock before, ask the seller for guidance. If they are selling the material and calling it "tumbling rough" we think that they should be able to provide instructions.
We are unable to give good guidance or provide instructions for tumbling rough that you have purchased from other people. Why? We have never seen that rough, never handled it, don't know its size or shape, and never tumbled it. Without that information we are unable to give you good advice. Your seller should have done these things if they called their product "tumbling rough".
Most sellers are a wealth of information for the tumbling rough that they sell. They are happy to help you and welcome your questions. That is how they will earn your future business. So, if you purchase rough and need assistance, the first thing that you should do is ask the seller for help. If the seller does not provide helpful information, or ignores your request, then maybe you are buying from the wrong seller.
Rocks with fractures often take a nice polish, but the fractures cause them to be unsightly. Rocks that are broken by a crusher or by hand with a chisel generally have fewer fractures than rocks that are smashed with a hammer. (Always wear long sleeves, long pants, gloves and eye protection when breaking rocks. Anyone nearby should also wear protection.)
2) Proper Rough Preparation
Some people think that a tumbler is a great place for the rejected rocks from all of their other lapidary activities. The rule to remember is:
"Garbage in means garbage out."
The most important thing that you can do prior to tumbling is to carefully look through the rocks and remove any that are going to cause problems. Remove rocks that might shed particles and dispose of them. One piece shedding particles will ruin the entire barrel.
Remove pieces with fractures, voids and other cavities that might offer hiding places for grit particles. These should be thrown away or broken to remove the parts that can cause problems. It's better to throw a few rocks away than ruin a month of work and the cost of grit, polish and electricity.
The secret to producing nice tumbled stones is being "picky."
Finally, it is best to collect or buy tumbling rough that is properly sized for tumbling. Breaking tumbling rough is dangerous work that usually produces disappointing results. We do not recommend it.
3) Cleanliness in Tumbling
After you finish tumbling a batch of rocks in coarse grit, your most important job is cleaning the rocks, media, barrel and lid. Every particle of coarse grit must be removed, or it will cause scratching in the next tumbling step.
Tip: We have a toothbrush to scrub the edges and corners of tumbler barrels and rocks that might have attached grit.
Tip: It's also important to keep your grit and polish free from contamination. Be sure to wash and dry your spoon before using it to scoop out grit. (Or better yet, have a separate spoon for each grit size.) Coarse particles can get into fine grit or polish if you don't keep your tools clean. Replace the lid on grit and polish as soon as you are finished with them to avoid contamination.
Tip: Before you open the container of polish, it's not a bad idea to wipe off the lid or the bag to reduce the chance of contamination. (Steve Hart, the author of Modern Rock Tumbling, stores his grit and polish on separate shelves. The grit is kept on the bottom shelf so particles of grit will not fall onto the polish containers.) Think about how you can reduce contamination problems where you do your work.
You need a variety of particle sizes in the barrel to get a great polish.
When using ceramic media, always be sure that it has been rinsed clean. Also, when running the polishing step, be sure that the media is extra clean and its most recent use was in fine grit or polish. New media must be run in fine grit before it is used in polish to remove any sharp edges that might remain from the manufacturing process.
4) Proper Sizing and Cushioning
A properly loaded rock tumbler will contain a range of particle sizes. Large pieces of rock will have small pieces of rock in the spaces between them. This is very important for grit delivery and cushioning.
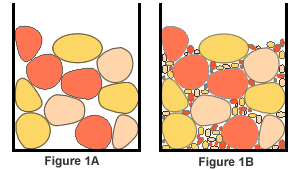
CUSHIONING
If you have a tumbler barrel filled with a few large rocks (like Figure 1A), there will be very few points of contact between the rocks. In that situation, all of the impact forces produced in the tumbler must be absorbed by a small number of rock-to-rock contacts. All of that concentrated force can lead to chipping and breaking.
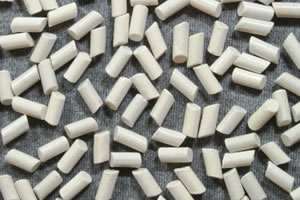
If you place small rocks in the barrel with the large rocks (like Figure 1B), then there will be many more rock-to-rock contacts to share the impact force. The small rocks absorb impact forces and cushion the tumble. If you don't have small rocks, you can use small ceramic cylinders to fill those spaces.
Some materials such as obsidian, Apache tears and glass are easily "bruised" in the tumbler. Bruises are small fractures or chips produced by rock-to-rock impacts in the barrel. Some people add plastic pellets to their barrel to cushion the impacts.
We have great success polishing glass, obsidian and Apache tears when they are "swimming" in small ceramic cylinders. "Swimming" means that at least 50% of the load is small cylinders. A lot of small particles in the barrel with your delicate materials will support them as they tumble and soften impacts. We have also found that a vibratory tumbler is gentler on these types of materials than a rotary tumbler.
Obsidian and quartz often show "bruising" when they are not being cushioned properly in the tumbler. They will develop white marks on their tips and edges. These white marks are actually a concentration of microfractures in the rock that are created as the rocks are hammered against one another in the tumbler.
Adding more small material or ceramic media will often solve this problem. In a rotary tumbler, a barrel that does not have enough rocks can be the culprit. The rocks get tossed around when your barrel is not up to proper capacity. In a vibratory tumbler, having the barrel too full can prevent a smooth circulation in the bowl. When the circulation is sluggish, the rocks at the top of the bowl can hammer against one another at a rate of 3600 strikes per minute!
Using quality abrasives (grit and polish) of the proper size and in the proper sequence is one of the secrets to great tumbling.
GRIT DELIVERY
A large number of rock-to-rock contacts also produces more grinding and polishing. Each of those contact points is a location where grit can be caught between the rocks to produce a grinding or polishing action. Very little grinding and polishing will be done in a barrel with a few large rocks (such as Figure 1A). Much more grinding and polishing will occur when the large rocks have small particles filling the spaces between them (such as Figure 1B).
5) Quality Abrasives and Media
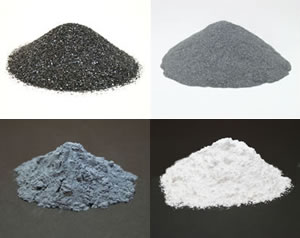
Using quality abrasives of the proper size is very important for success in tumbling. We use three grit sizes followed by a polish and have great results. We begin with coarse grit silicon carbide (60/90), followed by medium grit (150/220), followed by fine grit (500), and finally a polish (TXP aluminum oxide).
The amount of time that we tumble rocks in these grits in a rotary tumbler depends upon the hardness of the rough. Agates and jaspers between 1/2 inch and 1 1/2 inches in size are usually tumbled for seven days in coarse, checked for shape, and tumbled longer if needed. Softer materials and smaller sizes are tumbled for less time. Harder materials and larger pieces are tumbled longer. Tumbling time in medium and fine grits varies. We provide tumbling times on the pages of this website where tumbling rough is sold. The polish is always run for seven days and is sometimes followed by a short tumble in soapy water, known as burnishing, to remove any film that built up on the rocks during the polishing step.
Most of the people who sell rock tumbling grit and polish provide quality products. However, there are many sub-standard products being sold. They could be poorly sized, contaminated, or mislabeled, at any point between the factory and end consumer. They might have been imported from a company that is cutting corners or using malfunctioning equipment. They could have been inadvertently contaminated by someone who incorrectly added the wrong material to a batch. Everyone makes occasional mistakes. Some people discard bad material, others will sell it to you.
Media can be a source of contamination if it is not cleaned thoroughly, if it is kept in an open container, or if it is used without being properly broken in. We never use media in the polishing step that has not already been run through coarse, medium and fine grits. Brand-new media may have sharp edges that can produce scratches during the polishing step.
We use an abrasive-free media that is rinsed clean before use. There are ceramic medias out there with grit embedded in the media. That type of media is used for deburring and polishing metal and will not work for rock tumbling. Make sure you are using a polishing-grade media, which is what we sell here.

Few things are more rewarding than producing a batch of beautifully polished stones!
6) Tumbling for the Proper Amount of Time
Sometimes folks think that if a week in polish is good, then two weeks or a month will be even better. That is absolutely not the case. When you run rocks in the polishing step, there will probably be a few contaminating grains in there no matter how clean and tidy you work.
The longer you run the polishing step, the more scratches these grains will make. There might also be a few grains liberated from the rocks in the barrel. So, run the polish long enough to bring out a luster and stop. If you have doubts, pick out a few stones, wash them and save them for reference. Then run a couple more days, open the barrel, pull out a few stones and compare.
Generally, one week of polishing in a rotary tumbler is adequate. Two days in a vibratory is usually more than enough. The only exception to these is when you are tumbling really hard rocks. Rocks with a Mohs hardness over seven can require more than one week. Then a little more time makes a difference. A lot of time will make a difference in the wrong direction. So, resist trying to do too good of a job.
7) A Person With the Proper Skill Level
Often people want to tumble rocks that are above their skill level. Rocks such as agate or jasper are very easy to polish successfully. But other rocks can require adjustments to tumbling times, use of cushioning material, or even polishing in a media such as dry corncob.
A beginner trying use a rock tumbler to polish apatite, calcite, opal, Petoskey stones, Apache tears, serpentine, and other soft, friable, or easily broken rocks will rarely be successful. Why? Because they are not familiar with the special methods required. Beginners should tumble a lot of easy-to-polish rocks before they attempt advanced materials.
We label all of the rough that we sell to inform buyers of the skill level required...
 ,
,  , and
, and  What do they mean?
8) A Tumbler that Tumbles Gently
Stones such as agate, jasper and other varieties of chalcedony are very durable and are able to be polished in almost any rock tumbler. However, most other rocks require a gentle tumbling action to produce tumbled stones that are free from chips and bruises. If your tumbler is a little too fast for the rocks that you are tumbling, you can often compensate for the speed by adding ceramic or plastic media.
The media fills the spaces between the stones and absorbs some of the force of stone-to-stone impacts. However, if your tumbler is extremely fast, it can be impossible to cushion many types of rocks well enough to avoid damage. If you own one of those tumblers, your tumbling will be limited to extremely durable rocks such as agate, jasper, and other varieties of chalcedony.
Correcting a Bad Polish
If you have a batch of rocks that receive a bad polish, the best thing to do is to examine them one-by-one to see if you can identify the problem. Are gritty stones shedding grains during the polishing step? Are broken stones scratching every other stone in the barrel? If these things are happening, you should be able to see scratches on the surface of your tumbled stones (use a magnifying glass for a good look). If this has occurred, you can probably go back to the medium grit step (about 150/220) and rerun for a few days, then move on to fine grit and polish as normal.
If your stones are just not shiny, there might be a fog on your stones caused by hard water or a tenacious polish. Check out our article on burnishing tumbled stones to reveal the brilliant polish.
If your stones don't have a bright polish and you can see tiny scratches with a magnifying glass, then you might have contaminated grit or rocks that are shedding tiny particles during the polishing step. Any rocks that will produce grains when you hold one in each hand and rub them vigorously together are not good rocks for rock tumbling. They will shed particles during the polishing step. Toss them out or use them on your driveway or landscaping.
If you obtained an open bag of grit or polish at a yard sale, or have an open bag that has been sitting around your house for years, toss it out because it might be contaminated. Spilling a few grains of grit into your polish or dipping into it with an unwashed spoon can contaminate the entire container. Do everything possible to keep your grit and polish uncontaminated.
If you think that you understand the problem and want to retumble, back up one step. That means, if you think that the problem occurred during the polishing step, retumble in fine grit and then try the polish again.
Good Luck!
If you follow the tips above, and buy supplies from trusted sources, you should be rewarded with superbly polished stones. Try to diagnose any problems that you see. Most problems can be solved by simply being careful and not tumbling rocks that might produce questionable results.
Happy Tumbling!
RockTumbler.com Authors
 |
Hobart M. King has decades of rock tumbling experience and writes most of the articles on RockTumbler.com. He has a PhD in geology and is a GIA graduate gemologist. He also writes the articles about rocks, minerals and gems on Geology.com. |